Store Guide
Welcome to the CartWisp Store Guide. This guide helps Shopify merchants use CartWisp to manage checkout governance, create checkout rules, configure Customer Tiers, review tier classification requests, and prevent invalid or non-compliant orders before they are placed.
From the CartWisp dashboard, you can manage the full checkout control workflow, including creating, testing, activating, monitoring, and optimizing rules. You can also review customers requesting classification into tiers such as Above 18, Wholesale Buyer, Licensed Buyer, or Verified Business Buyer.
Whether you are enforcing B2B order requirements, managing age or region restrictions, or preventing shipping and payment issues, CartWisp gives you a centralized way to control checkout with structure, visibility, and confidence.
Getting Started
Before using this guide, make sure you have already installed CartWisp and completed the initial setup steps from the Installation & Configuration Guide.
At minimum, your store should have:
- CartWisp installed on your Shopify store
- An active CartWisp plan
- Access to the CartWisp dashboard
- Your key checkout control goals identified
- Basic product, customer, shipping, and payment settings configured in Shopify
- Customer Tiers created if your checkout rules depend on customer eligibility
- The Customer Tier Classification Request Extension added if customers need to submit classification requests from the storefront
Once these steps are complete, you can begin using CartWisp to configure checkout rules and manage customer eligibility.
Accessing the CartWisp App Dashboard
To access the CartWisp dashboard:
- Log in to your Shopify Admin.
- Go to Apps.
- Select CartWisp from your installed apps.
- You will be redirected to the CartWisp dashboard.
The CartWisp dashboard acts as your command center for checkout governance. From here, you can create checkout rules, manage Customer Tiers, process classification requests, review rule activity, access templates, test rule behavior, and monitor checkout impact.
If you use CartWisp frequently, it is recommended to pin the app inside your Shopify Admin navigation for quick access.
Understanding the CartWisp Dashboard & Features
Once CartWisp is installed and configured, the dashboard becomes your central workspace for managing checkout governance, rule activity, customer tier requests, app extensions, and store-level settings.
Depending on your active plan and enabled features, your CartWisp dashboard may include the following sections:
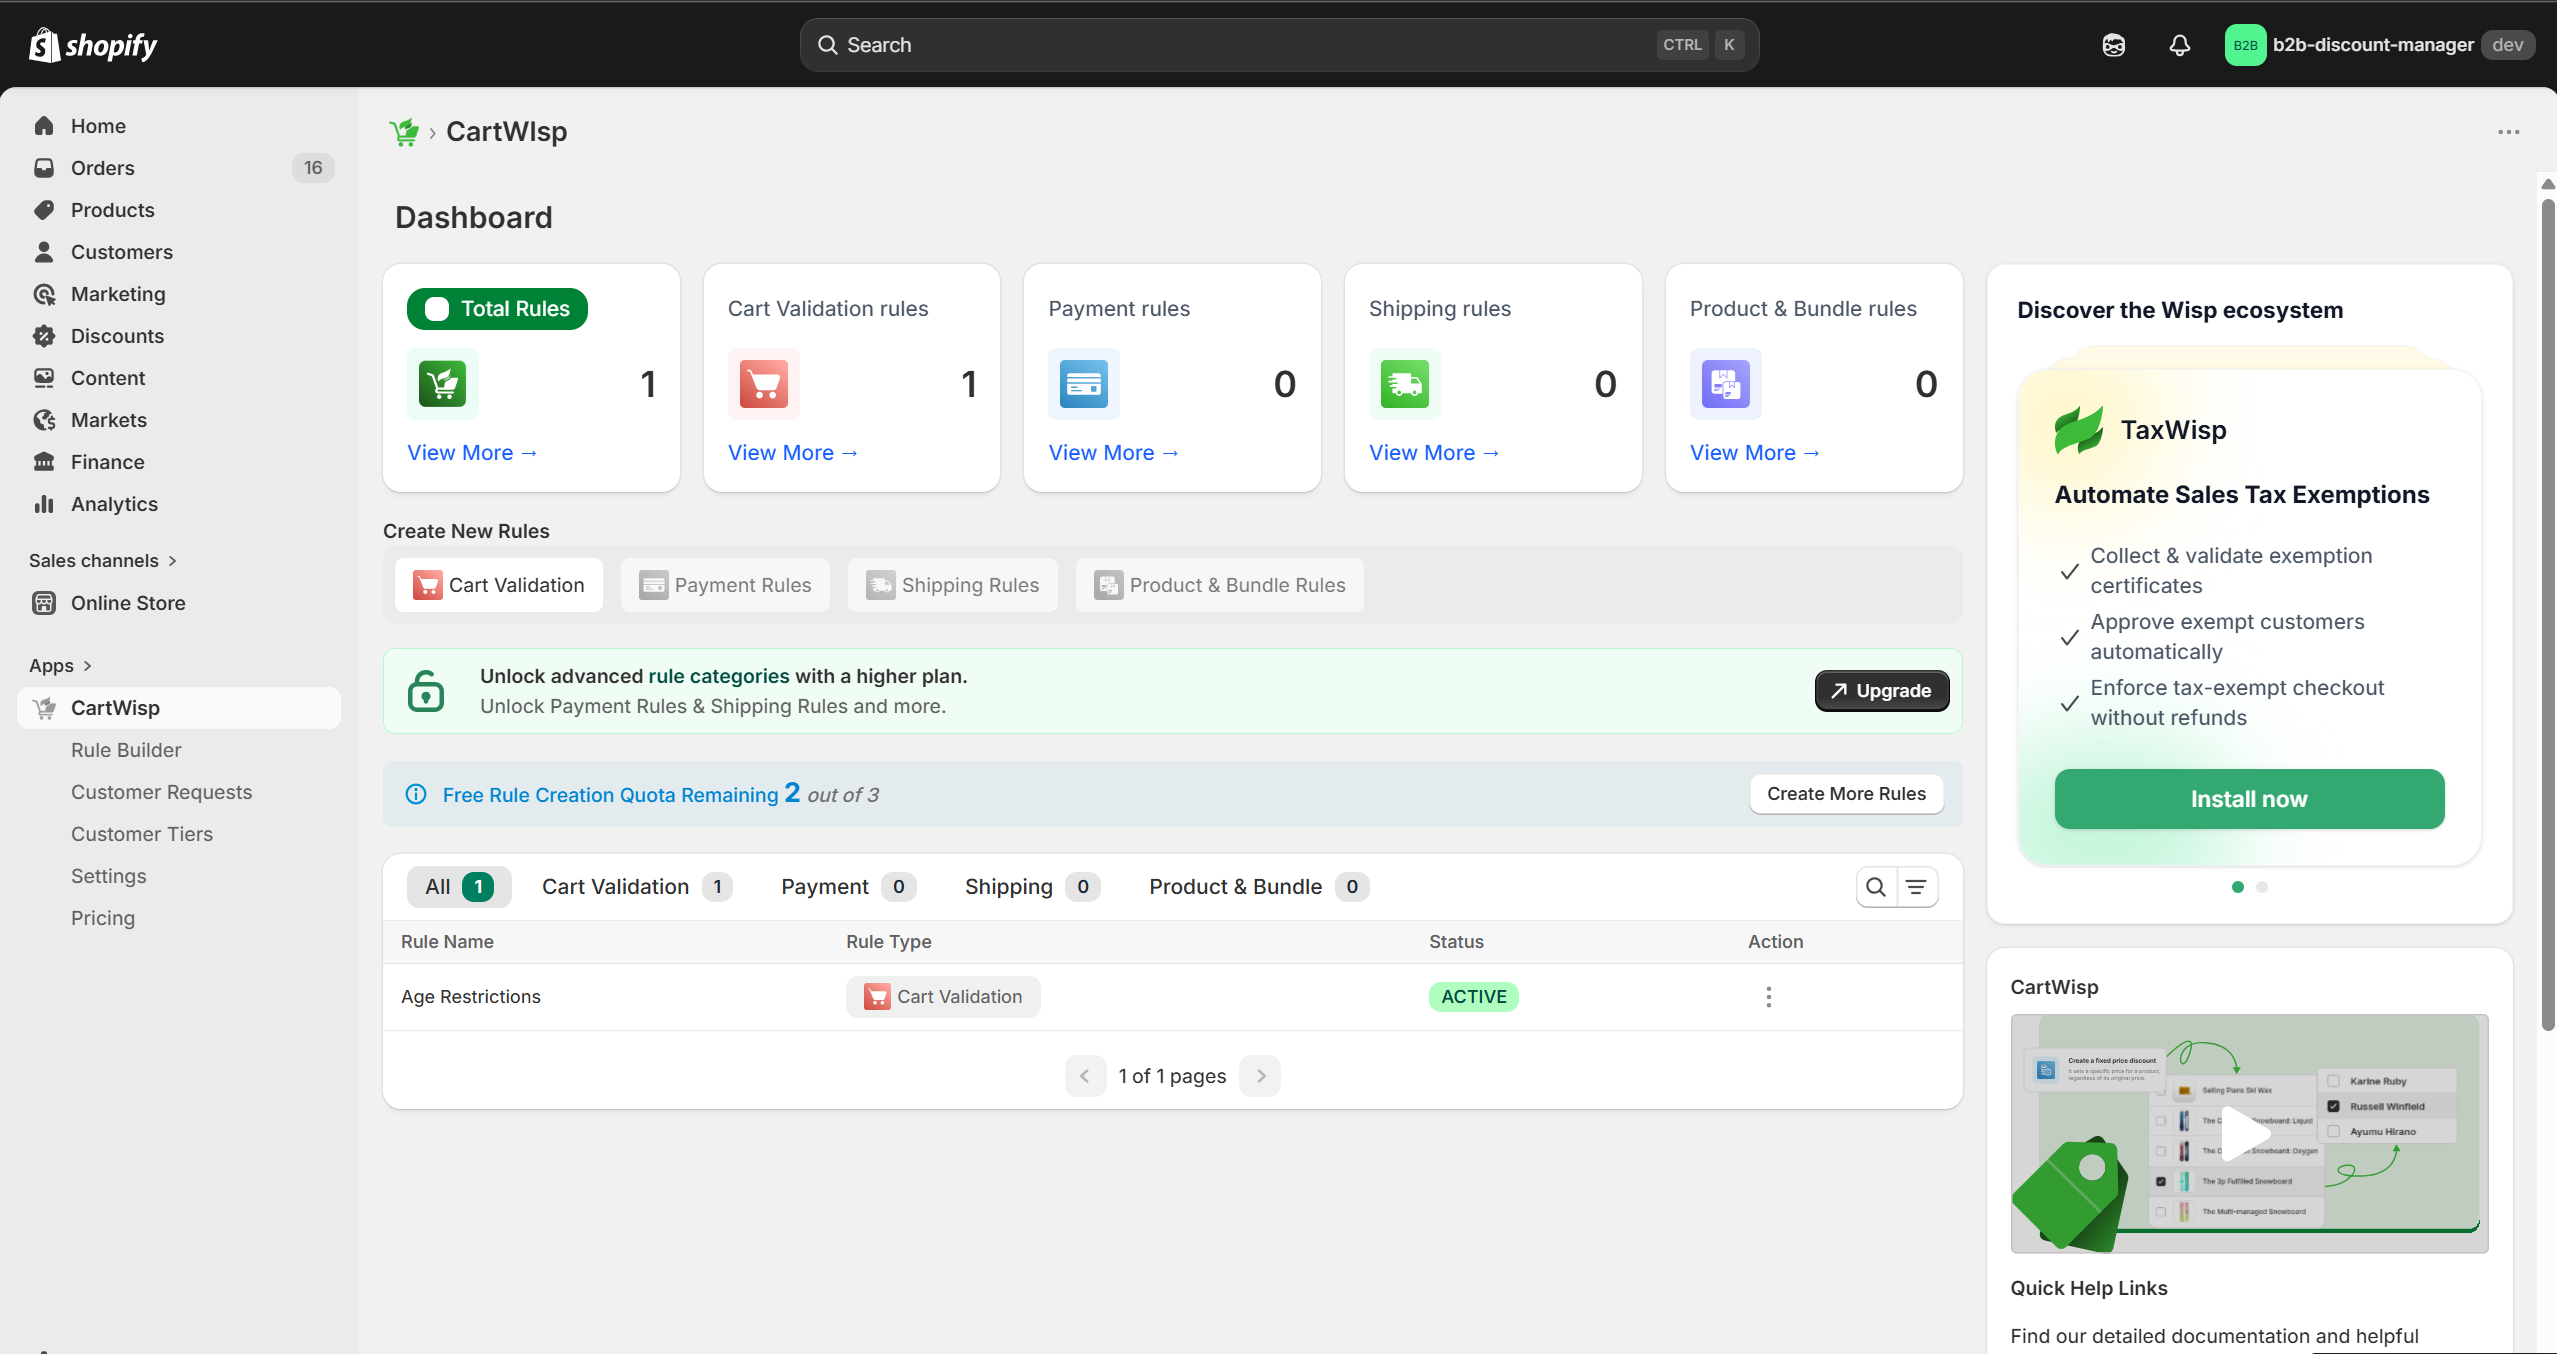
Primary Dashboard
The primary dashboard gives you a quick overview of your CartWisp setup and recent activity.
This page includes:
- Rule Insights
- Quick Links for Rule Creation
- Rule Creation Quota Details
- Rule Summary Table
- Support Information
- Quick Links for Documentation & Tutorials
- Shortcut to add App Extensions
This section helps you quickly understand your current rule usage, access important setup actions, and navigate to key resources.
Left Menu Navigation
The left navigation provides access to the main CartWisp modules, including:
- Rule Builder
- Customer Requests
- Customer Tiers
- Settings
- Pricing
Use this menu to move between rule management, customer classification workflows, app settings, and subscription details.
Rule Builder
The Rule Builder is where you create, manage, search, filter, and review checkout rules.
This section may include:
- Rule Summary Table
- Create New Rule Option
- Rule Creation Quota Information
- Search & Filter Options for the Rule Table
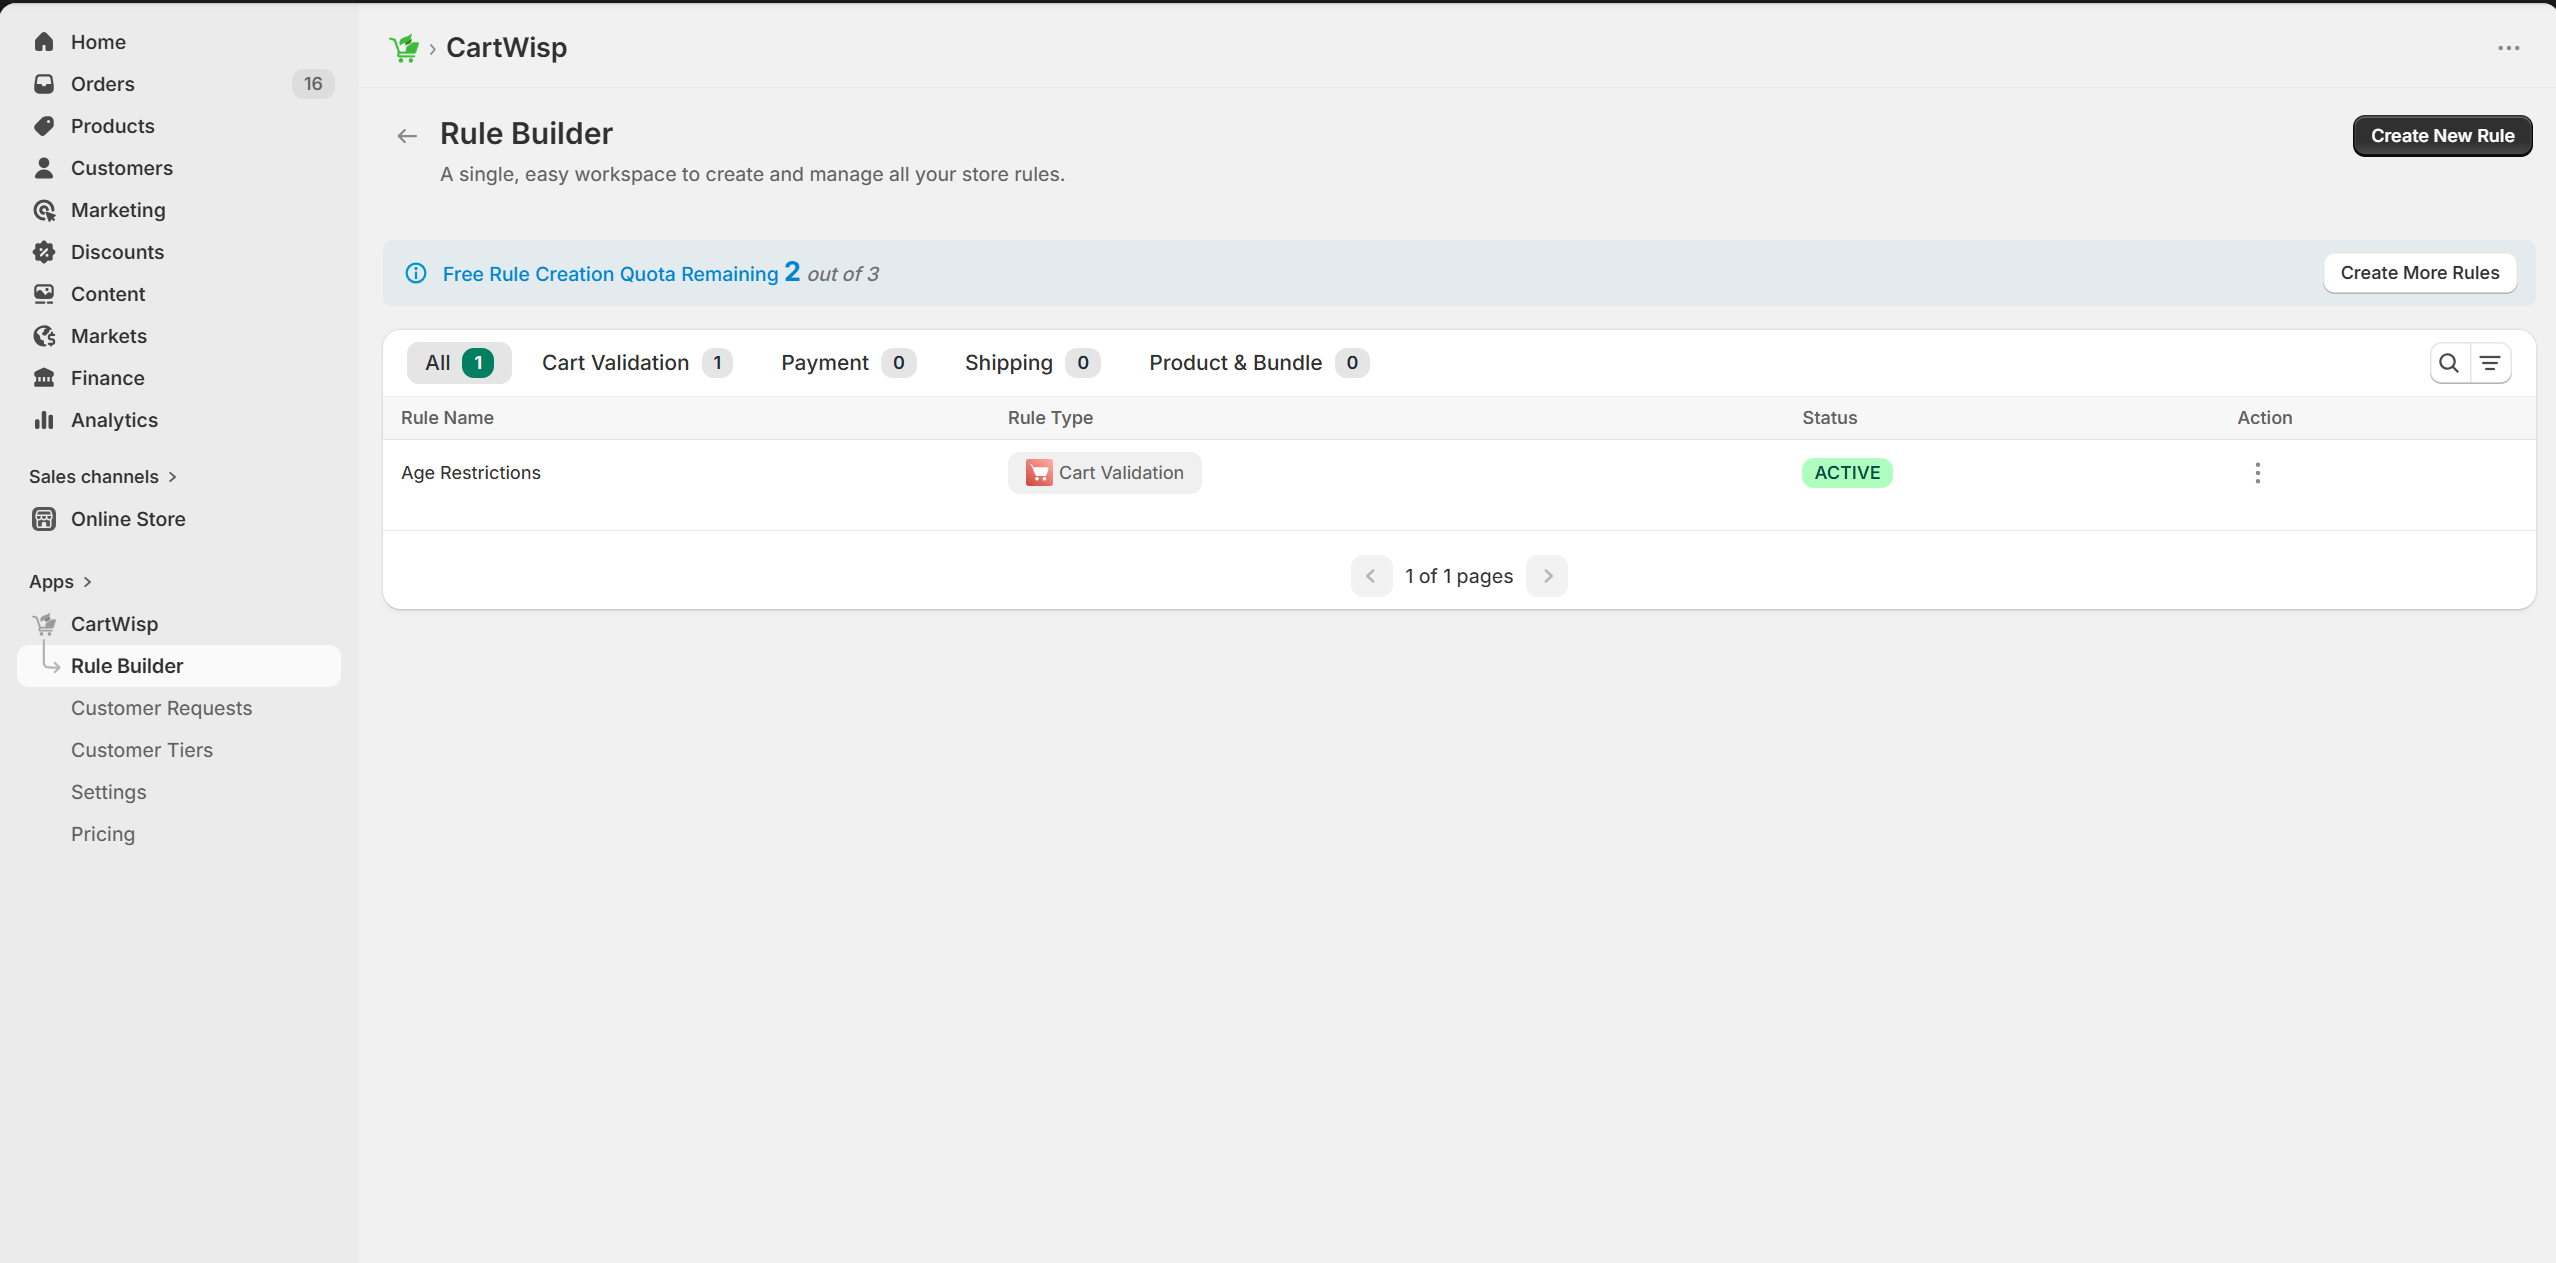
Use the Rule Builder to create new checkout rules, review existing rules, manage rule status, and keep track of your rule limits based on your plan.
Customer Requests
The Customer Requests section allows you to manage customer-submitted tier classification requests.
This section may include:
- Customer Request Insights
- Customer Request Summary Table
- Search Option

Use this section to review pending requests, approve or reject customer submissions, and monitor customer classification activity.
Customer Tiers
The Customer Tiers section allows you to create and manage the tiers customers can be classified into.
This section may include:
- Customer Tiers Summary Table
- Search Option
- Create New Tier Option
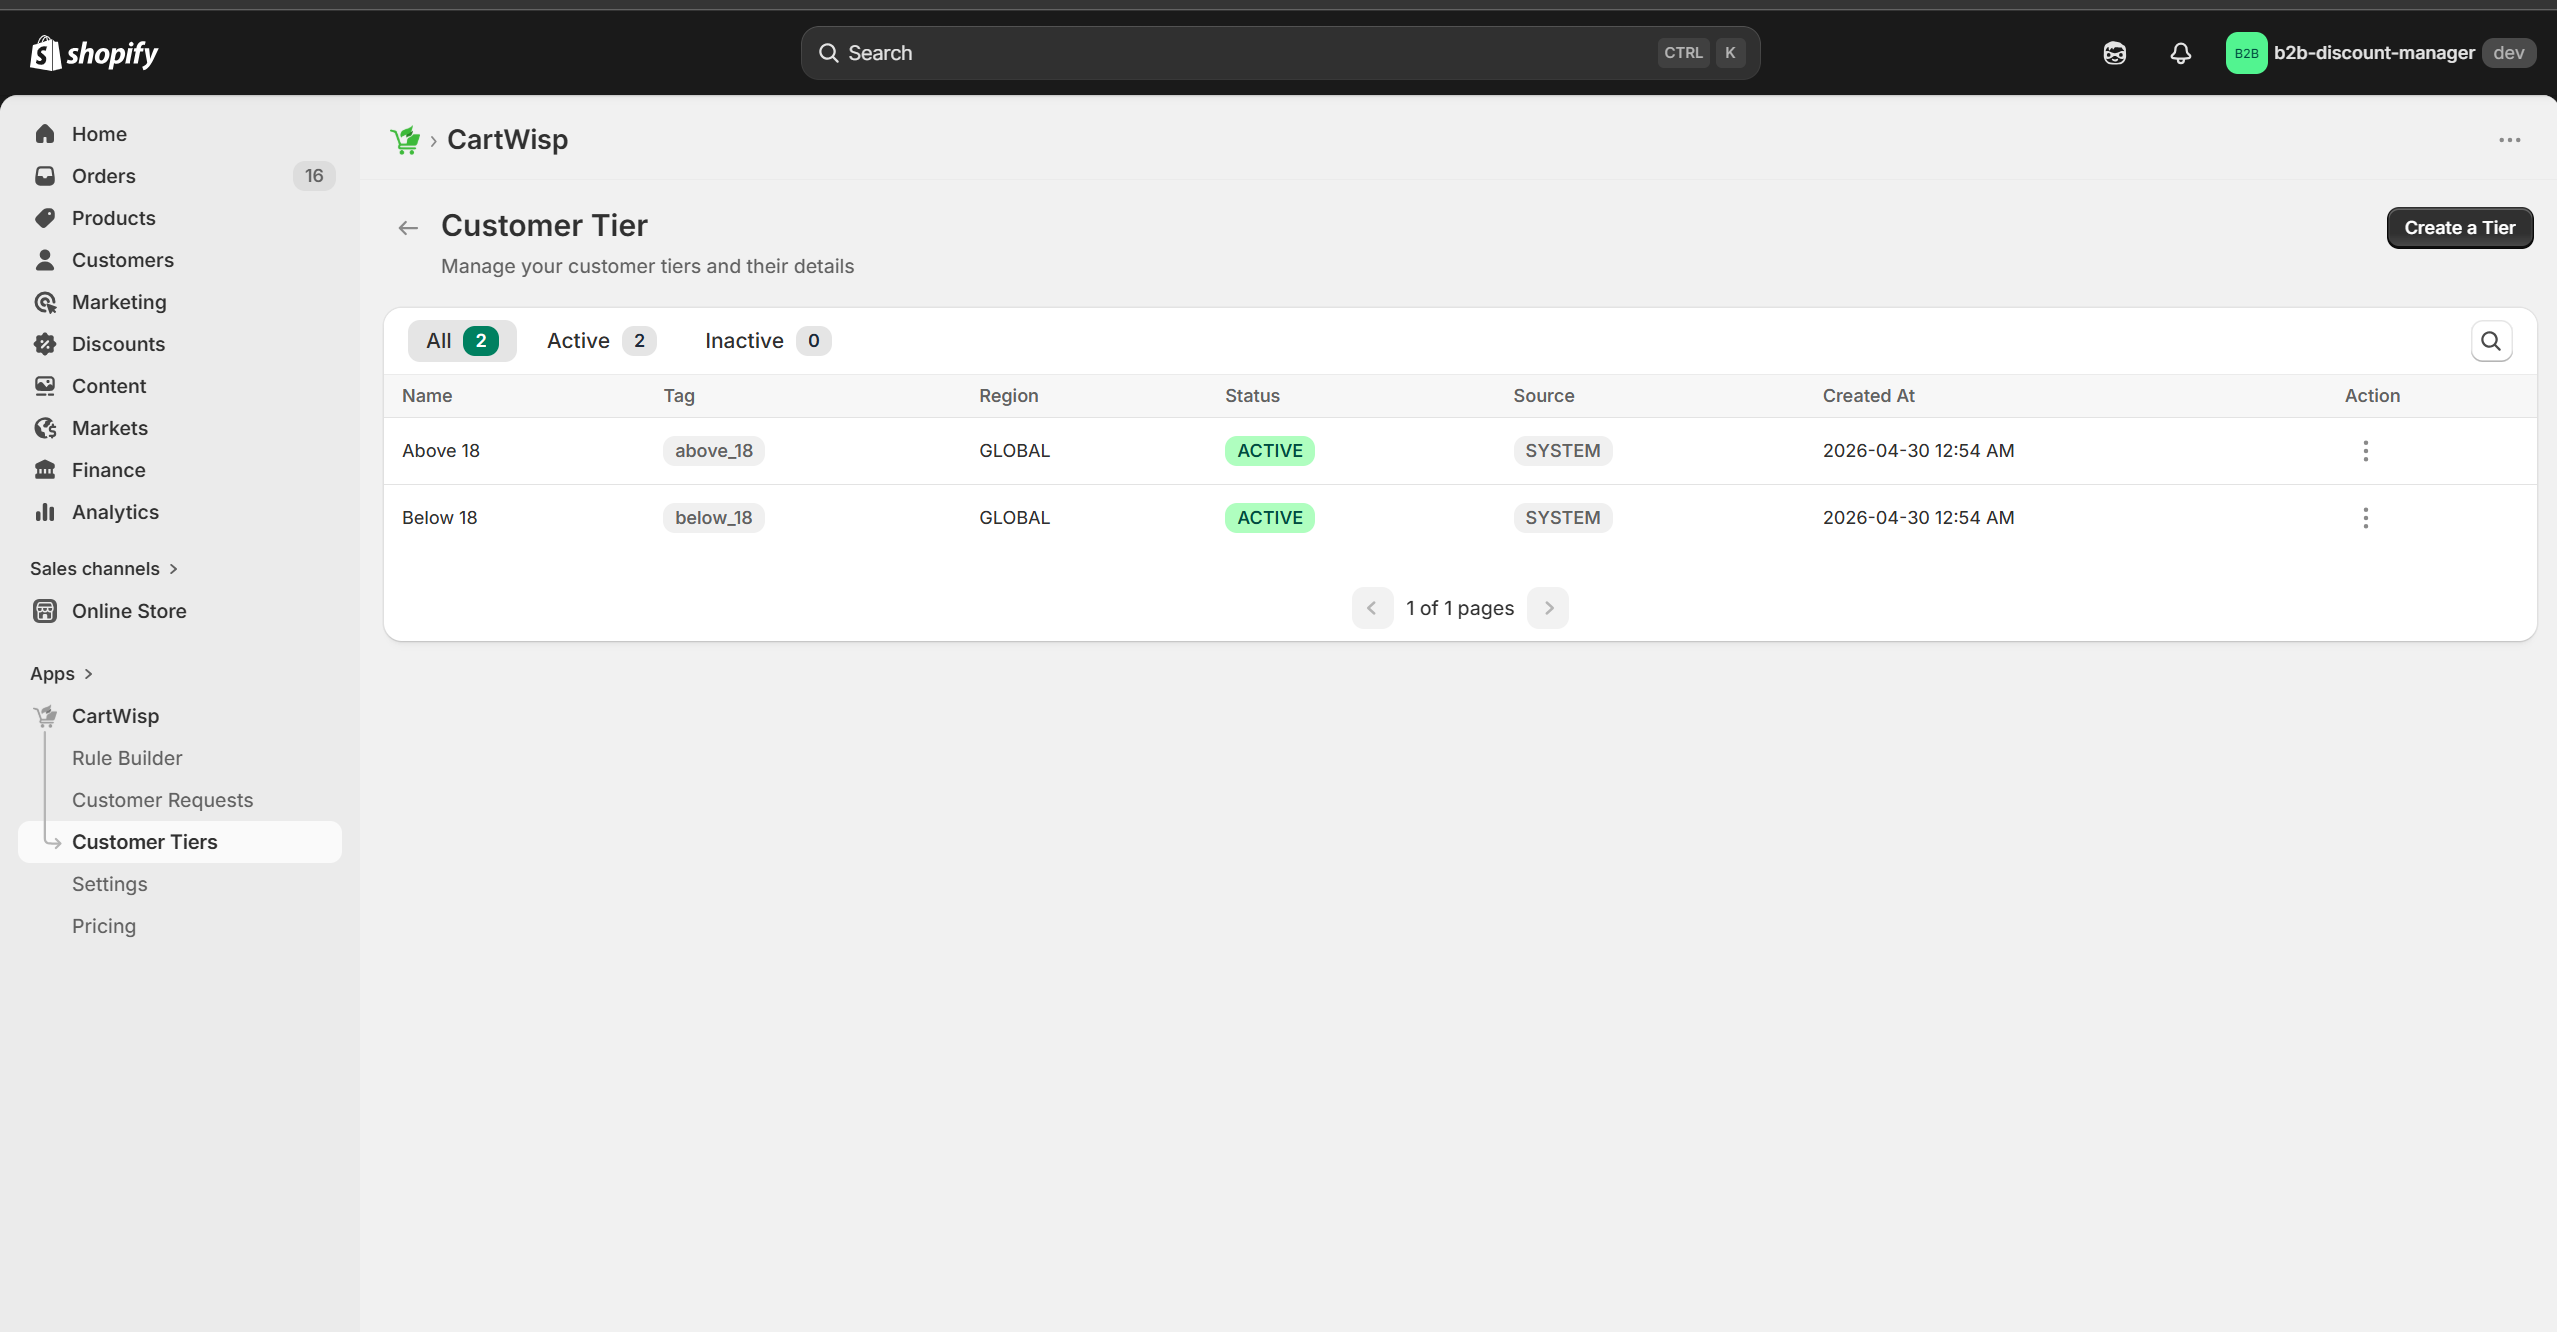
Use this section to define tiers such as Above 18, Wholesale Buyer, Licensed Buyer, or Verified Business Buyer, which can later be used in checkout rules.
Settings
The Settings section allows you to manage app-level preferences and customer-facing configuration.
This section may include:
- Approval Mode Selection for Customer Tier Classification Requests: Auto or Manual
- Communication Email Settings
- Co-branding Logo
- Tier Classification Display Content, including Label & Description
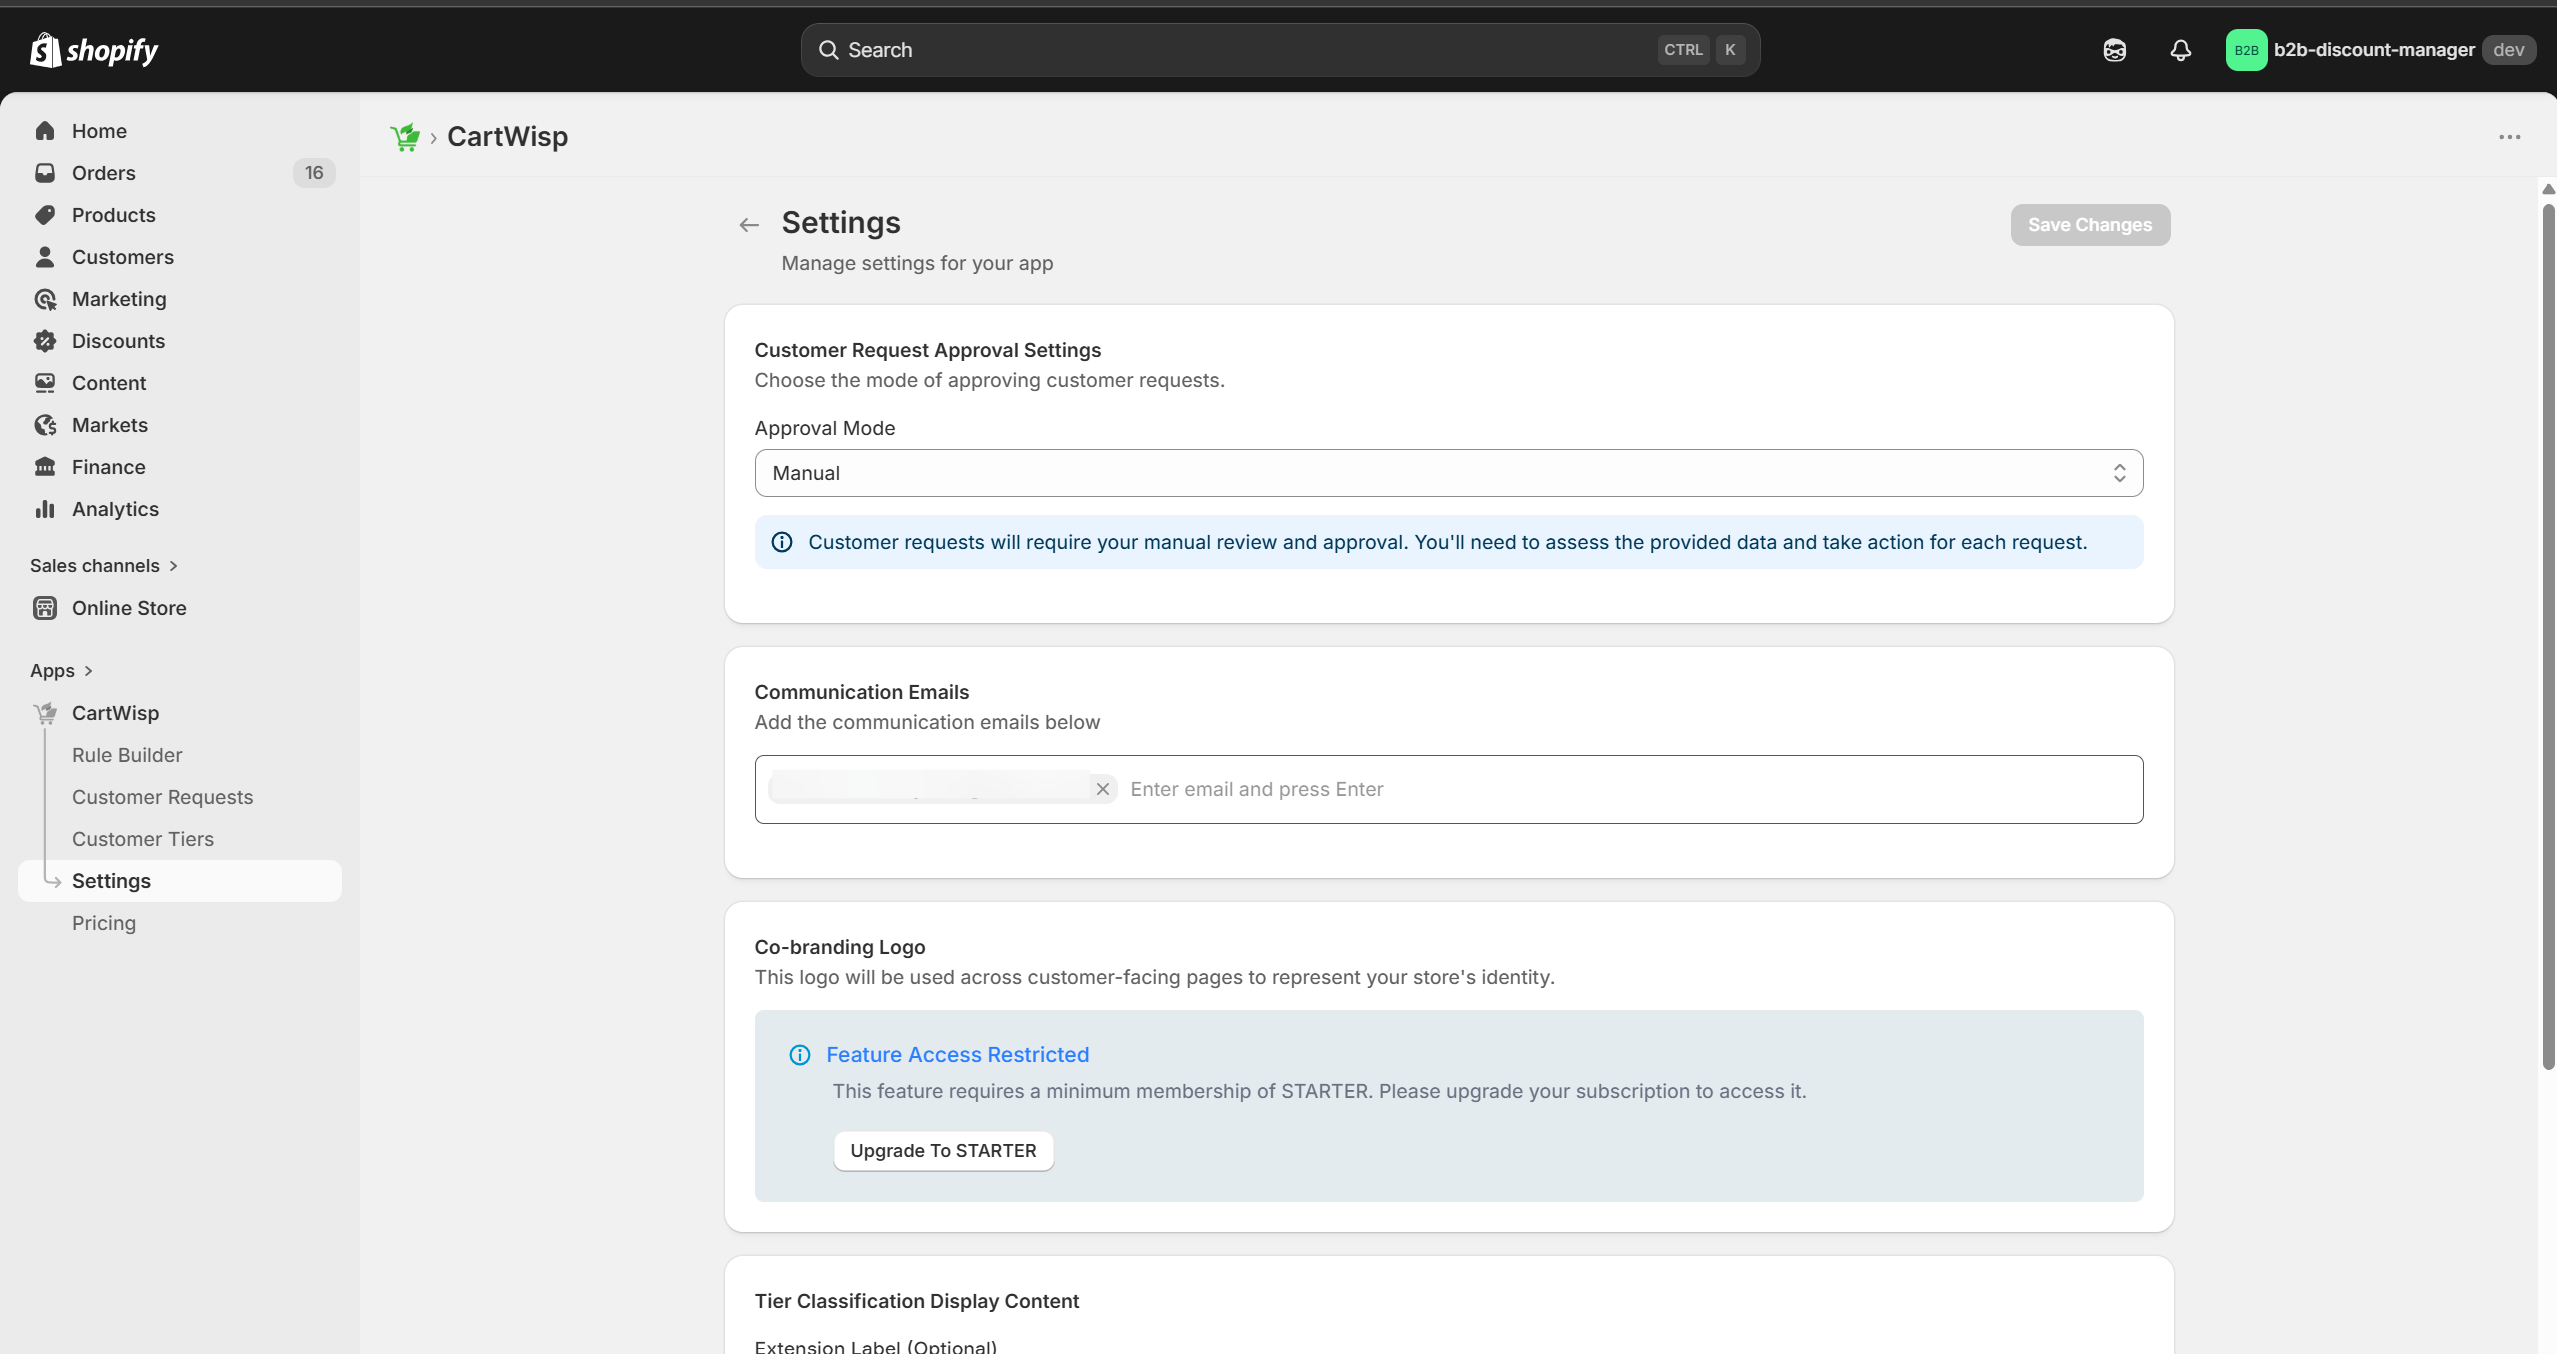
Use this section to configure how customer tier classification requests are handled, how communication appears, and how CartWisp-related content is displayed on your storefront.
Pricing
The Pricing section provides details about available CartWisp plans, pricing, and feature access.
This section may include:
- Current Plan Details
- Available Plans
- Pricing Information
- Feature Availability by Plan
- Upgrade or Downgrade Options
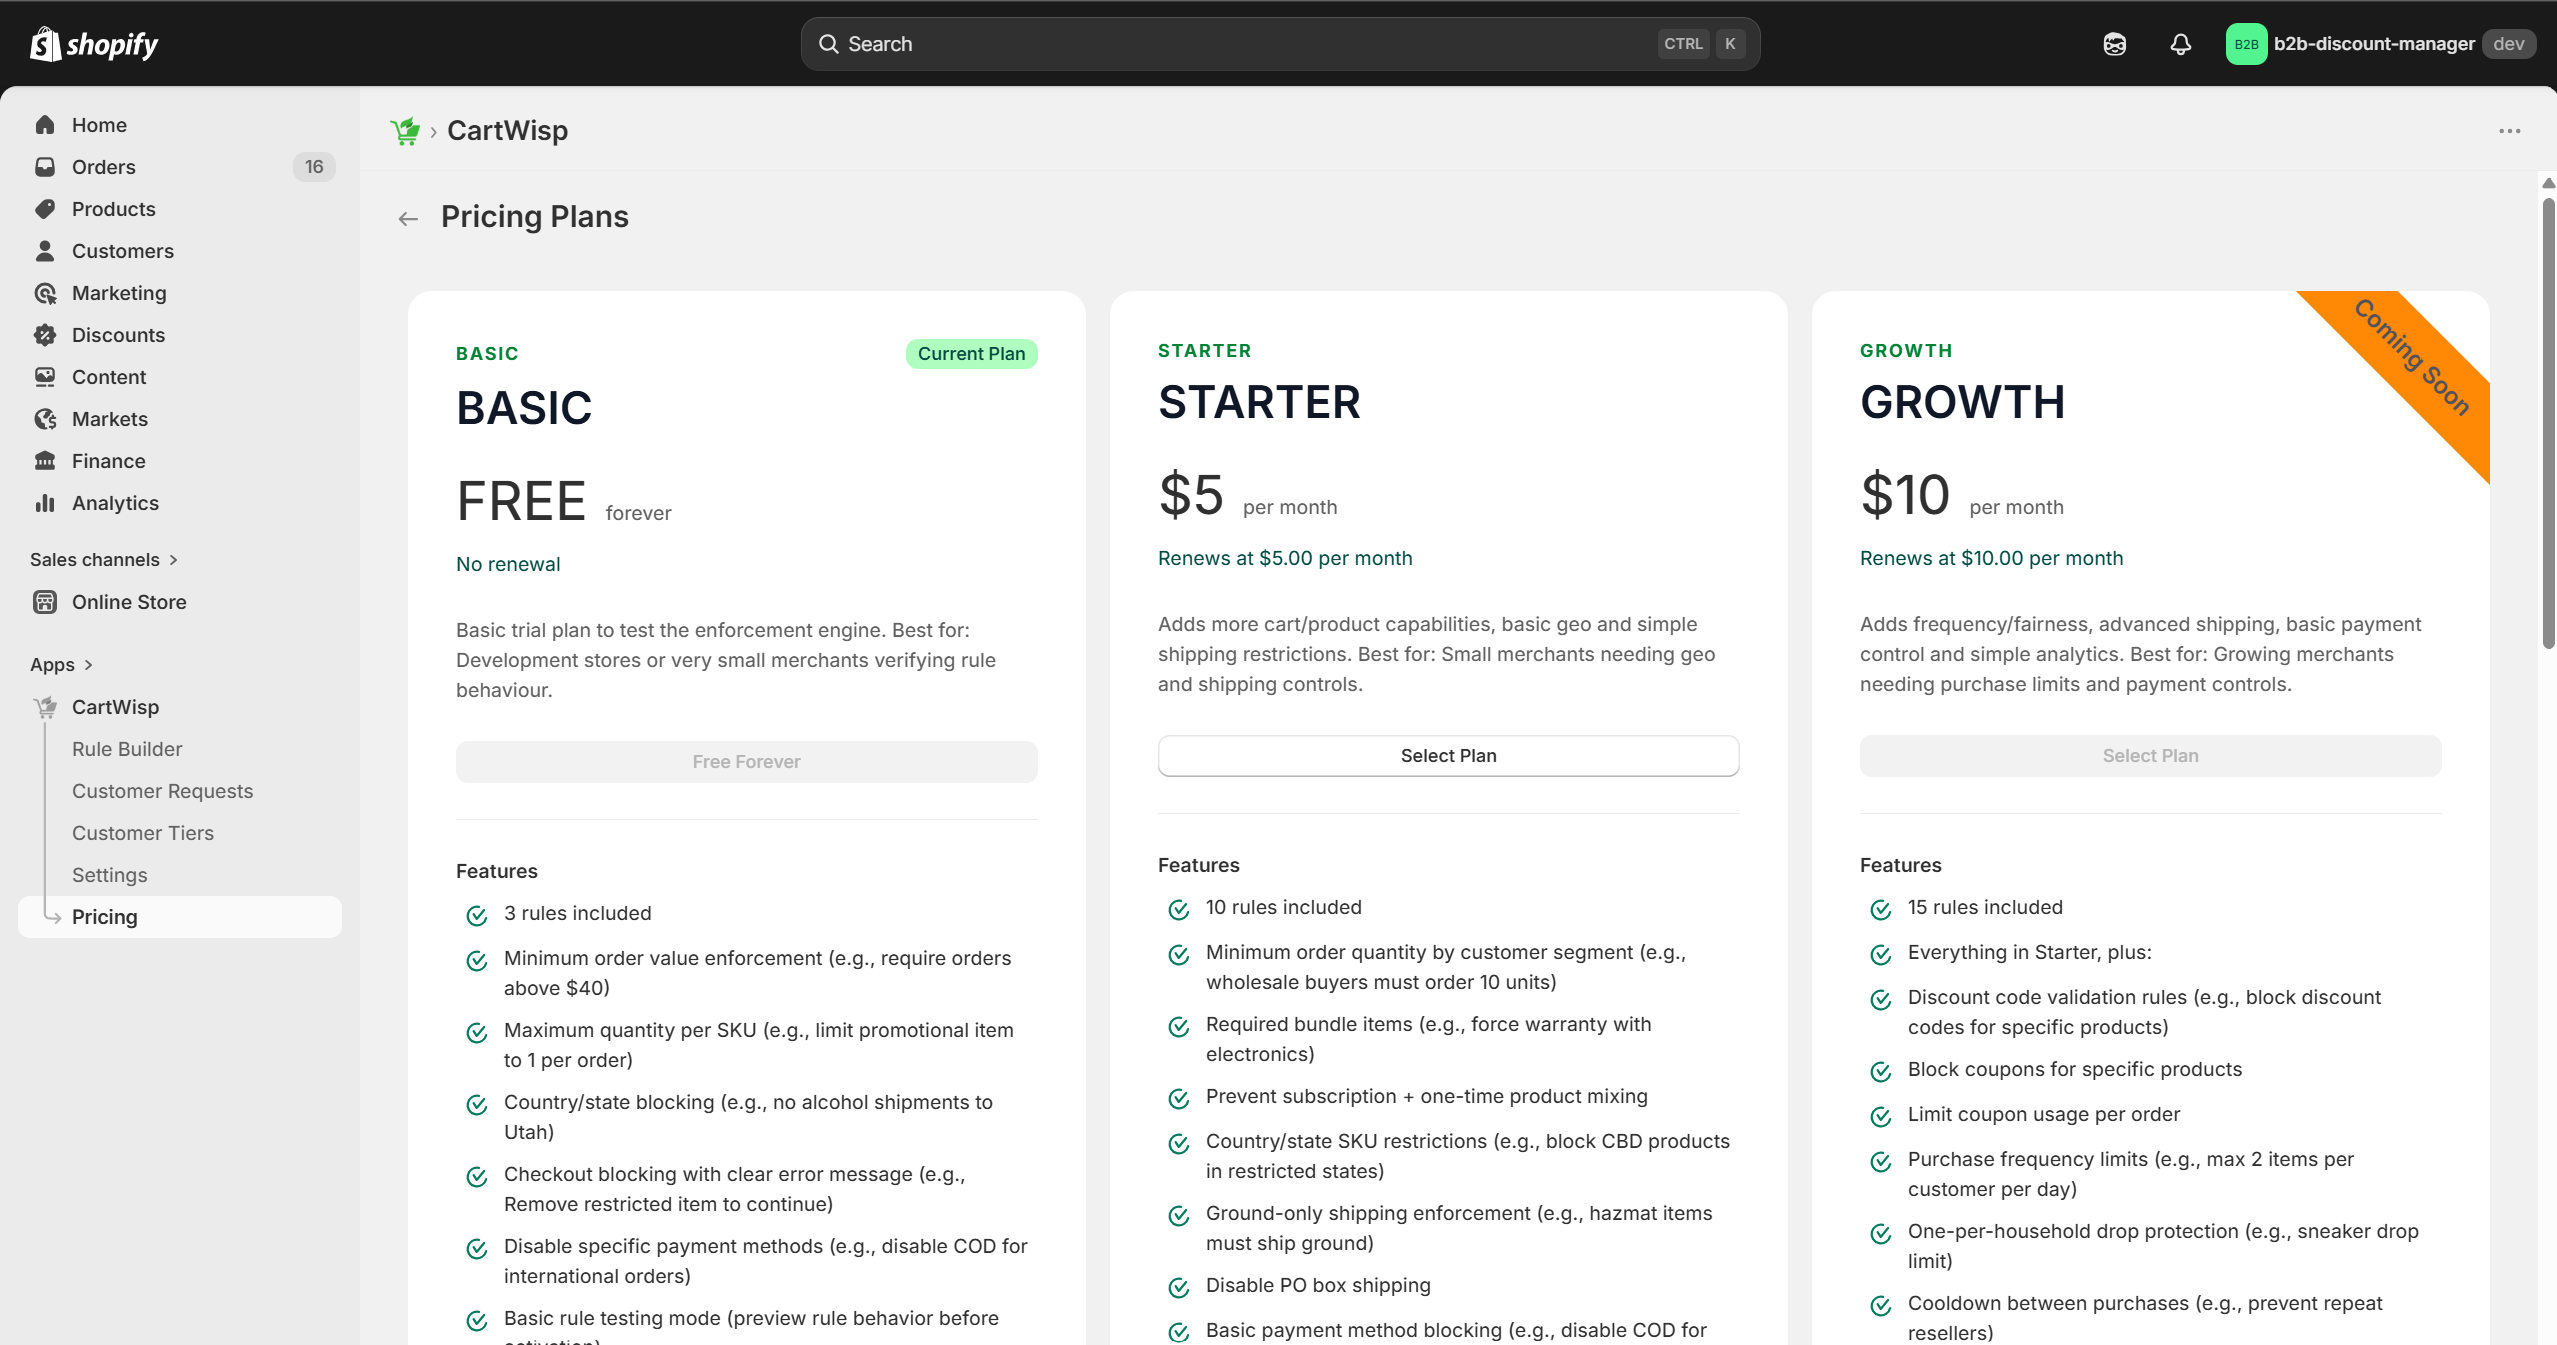
Use this section to review your subscription and understand which CartWisp features are available under your selected plan.
Customer Tier Management
CartWisp enables Shopify merchants to classify customers into Customer Tiers so checkout rules can be applied based on customer eligibility.
Customer Tiers help determine which customers are allowed to access certain products, shipping methods, payment methods, or checkout paths.
For example:
- Customers classified as Above 18 may be allowed to purchase age-restricted products.
- Customers classified as Wholesale Buyer may be required to meet B2B order minimums.
- Customers classified as Licensed Buyer may be allowed to purchase restricted products.
- Customers classified as Approved Distributor may be allowed to place bulk or company-specific orders.
Customer Tiers allow CartWisp to apply checkout rules with more precision.
Creating and Managing Customer Tiers
To create a new Customer Tier:
- Open the CartWisp dashboard.
- Go to Customer Tiers.
- Click Create a Tier.
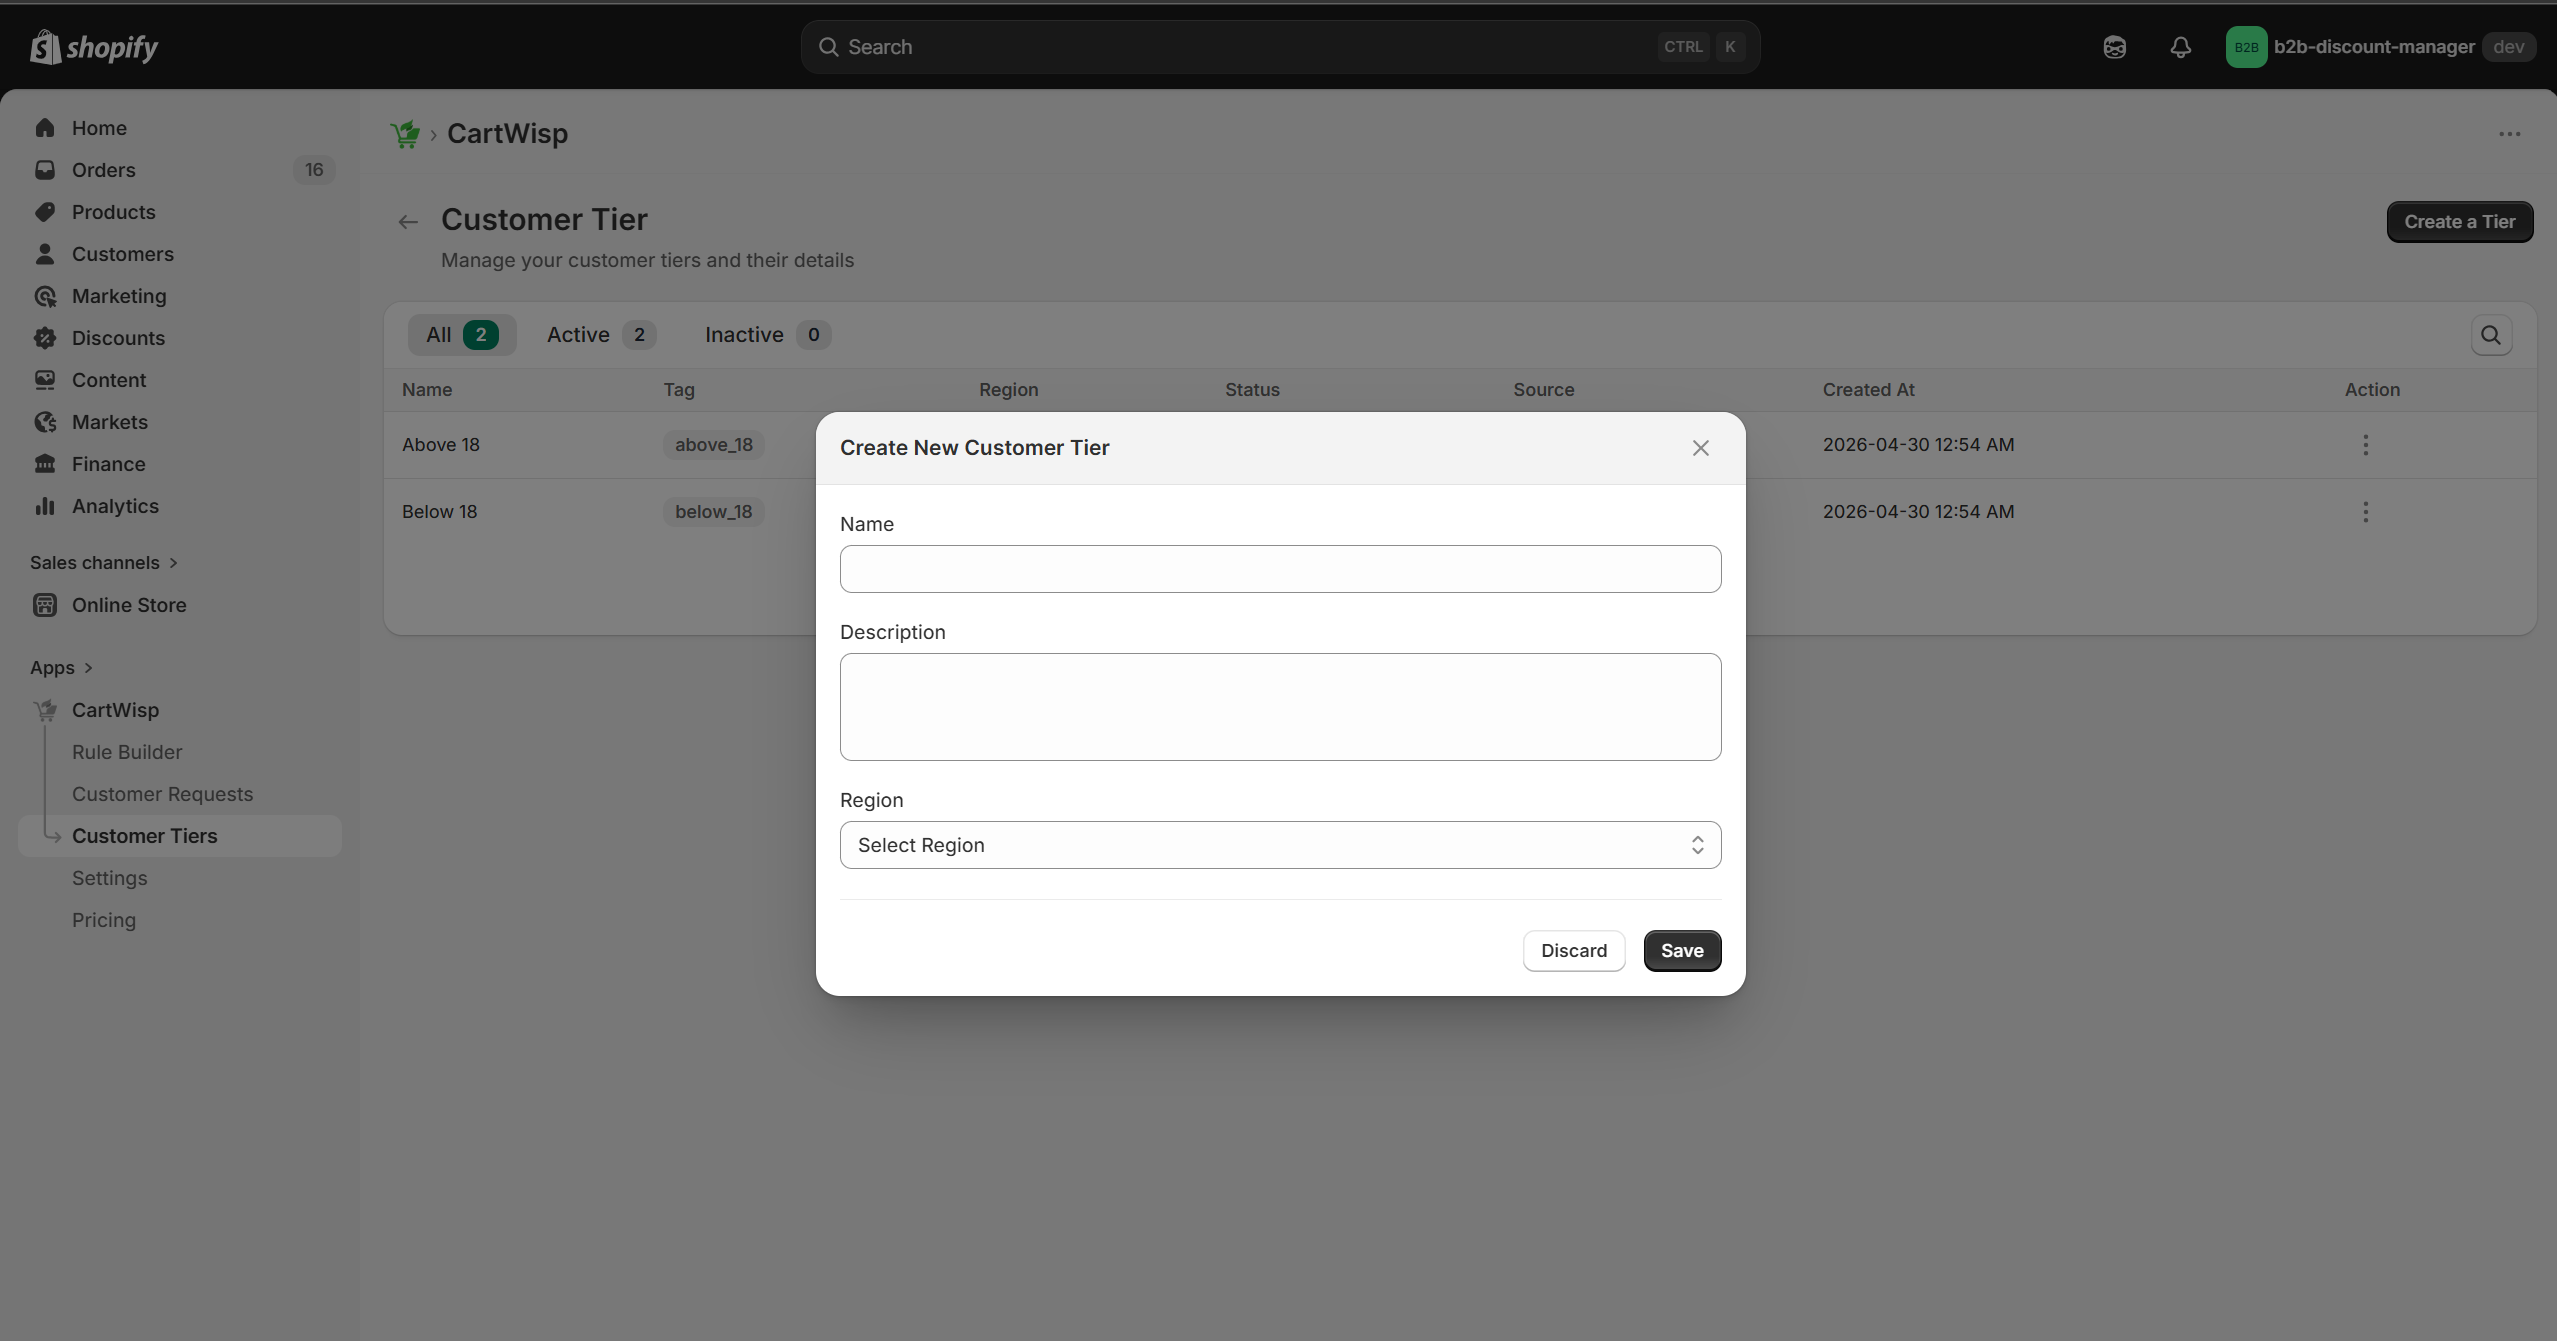
- Enter the tier name.
- Add a short description.
- Select or define the targeted region, if applicable.
- Save the tier.
Example tier setup:
- Tier Name: Above 18
- Description: Customers who are verified to be 18 years or older.
- Region: US
Once created, this tier can be used in checkout rules and tier classification request forms.
To edit an existing Customer Tier:
- Open the CartWisp dashboard.
- Go to Customer Tiers.
- Click on an existing Tier from Tier Table.
- Update the tier name, description, or region as required.
- Save the tier.
Examples of Customer Tiers
You can create Customer Tiers based on your store’s business and compliance needs.
Common examples include:
-
Above 18 Used for customers who are eligible to purchase age-restricted products.
-
Wholesale Buyer Used for approved B2B or wholesale customers.
-
Verified Business Buyer Used when customers need to prove they are buying on behalf of a business.
-
Licensed Buyer Used when customers must provide a license or authorization to purchase certain products.
-
Approved Distributor Used for distributor-only products or special purchasing permissions.
-
Restricted Product Buyer Used for customers approved to purchase a specific category of controlled or restricted goods.
Writing Clear Tier Name & Descriptions
A good tier name and description should explain who qualifies for the tier and how the tier is used.
Poor example:
- Tier Name: Adult
- Description: Adult customers.
Better example:
- Tier Name: Above 18
- Description: Customers who are verified to be 18 years or older and can purchase eligible age-restricted products.
Clear descriptions help store admins understand the purpose of each tier and reduce confusion when reviewing customer requests.
Targeted Region for Customer Tiers
CartWisp allows merchants to define a targeted region for Customer Tiers where applicable.
For example, an Above 18 tier may be created for the US, while another tier may be created for a different region if the eligibility requirement or supported rules vary by market.
This is useful when:
- Age requirements differ across regions
- Product restrictions depend on country or state
- B2B rules vary by market
- Certain tiers should only apply to specific sales regions
- Different compliance requirements apply by location
Customer Tier Classification Requests
CartWisp supports a customer-initiated classification flow where customers can request to be assigned to a specific Customer Tier. This is useful when the customer must provide proof or supporting information before becoming eligible for checkout rules. For example, a customer may request to be classified as Above 18 by uploading a valid government-issued ID.
How Customers Submit a Tier Classification Request
Customers submit requests through the Customer Tier Classification Request Extension added to your storefront.
The form typically allows customers to:
- Select the tier they want to be classified into.
- Upload supporting documents, if required.
- Submit the request for merchant review.
Example:
- A customer wants to purchase an age-restricted product. They open the classification request form, select Above 18, upload a government-issued ID, and submit the request.
The request then appears in your CartWisp dashboard for review.
Reviewing Tier Classification Requests
To review a request:
- Open the CartWisp dashboard.
- Go to Customer Requests or the tier classification request section.
- Select a pending request.
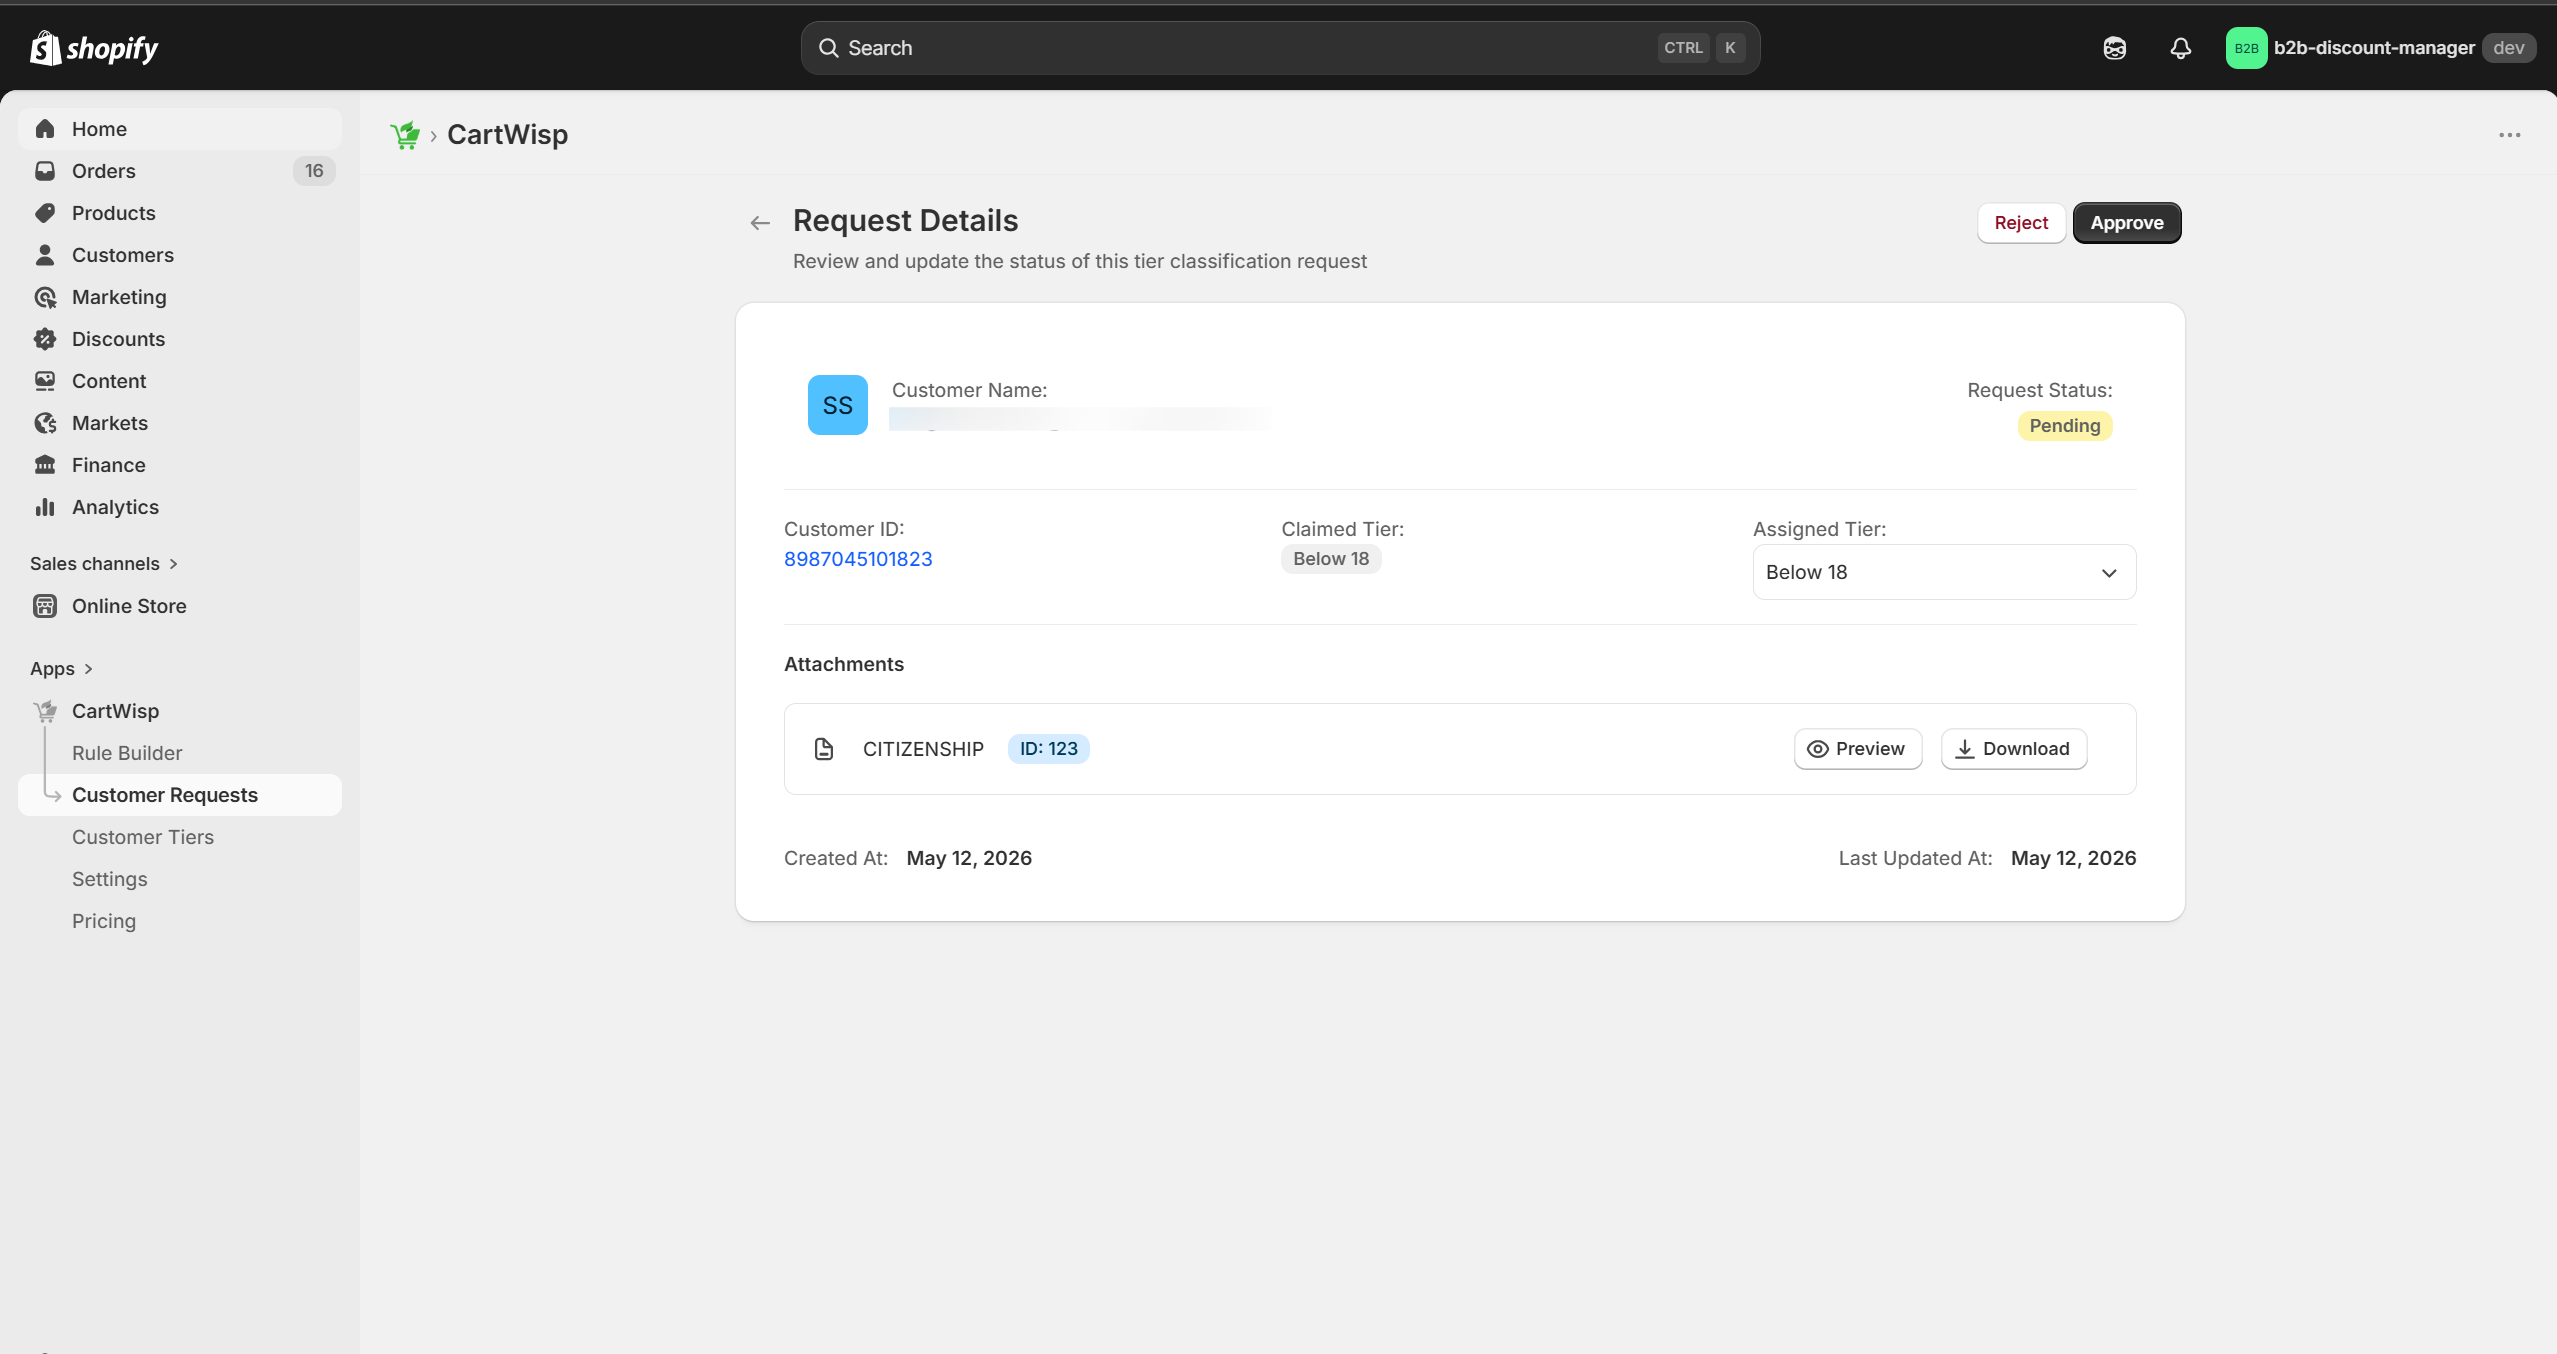
- Review the customer details.
- Review the requested tier.
- Open and review the uploaded document, if applicable.
- Approve or reject the request.
- Add a rejection reason if the request is rejected.
When reviewing documents, check whether the submitted information matches the requirement for the tier.
For example, for an Above 18 request, you may need to confirm that the uploaded document clearly proves the customer meets the age requirement.
Approving a Tier Classification Request
Approve a request when the customer meets the requirement for the selected tier.
When a request is approved:
- The customer is assigned to the requested Customer Tier.
- The request status changes to Approved.
- The customer becomes eligible for checkout rules tied to that tier.
- The customer may receive an approval notification, depending on your email settings.
- Future checkout attempts can recognize the customer’s tier classification.
Example:
- If a customer is approved for the Above 18 tier, CartWisp rules can allow them to purchase age-restricted products, provided all other conditions are also satisfied.
Rejecting a Tier Classification Request
Reject a request when the customer does not meet the requirement or when the submitted information is insufficient.
Common rejection reasons include:
- Document is unclear
- Document is expired
- Required information is missing
- Customer selected the wrong tier
- Uploaded document does not prove eligibility
- Customer information does not match the uploaded document
When rejecting a request, provide a clear reason so the customer understands what needs to be corrected.
Example rejection reason:
- The uploaded ID is not clear enough to verify the date of birth. Please submit a clearer document and try again.
Clear rejection reasons improve customer experience and reduce repeat support questions.
Revoking a Customer Tier Classification
In some cases, a previously approved classification may need to be revoked.
Common reasons include:
- Document expired
- Store policy changed
- Customer no longer qualifies
- Classification was approved by mistake
- Suspicious or incorrect information was discovered
- Compliance requirements changed
When a classification is revoked:
- The customer loses access to checkout rules tied to that tier.
- Future checkout attempts may be blocked.
- The customer may need to submit a new classification request.
Rule Builder: Creating & Managing Checkout Rules
Checkout rules are the foundation of CartWisp. They define what conditions must be met before a customer can complete checkout.
A rule tells CartWisp:
- Which cart or checkout scenario to evaluate
- Which products or collections the rule applies to
- Which customers or tiers the rule applies to
- What condition must be checked
- What action should happen if the condition is met
- What message should be shown to the customer
Understanding CartWisp Rule Structure
A CartWisp rule generally follows this structure:
IF a condition is met, THEN perform an action.
Example:
- IF cart subtotal is below $40, THEN block checkout.
Another example:
- IF cart contains age-restricted product AND customer is not in Above 18 tier, THEN block checkout.
This structure helps merchants create checkout rules that are clear, predictable, and easy to test.
Creating a New Rule
To create a new checkout rule in CartWisp:
- Open the CartWisp dashboard.
- Go to Rule Builder.
- Click Create New Rule.

- Select a Rule Category based on the type of checkout control you want to configure.
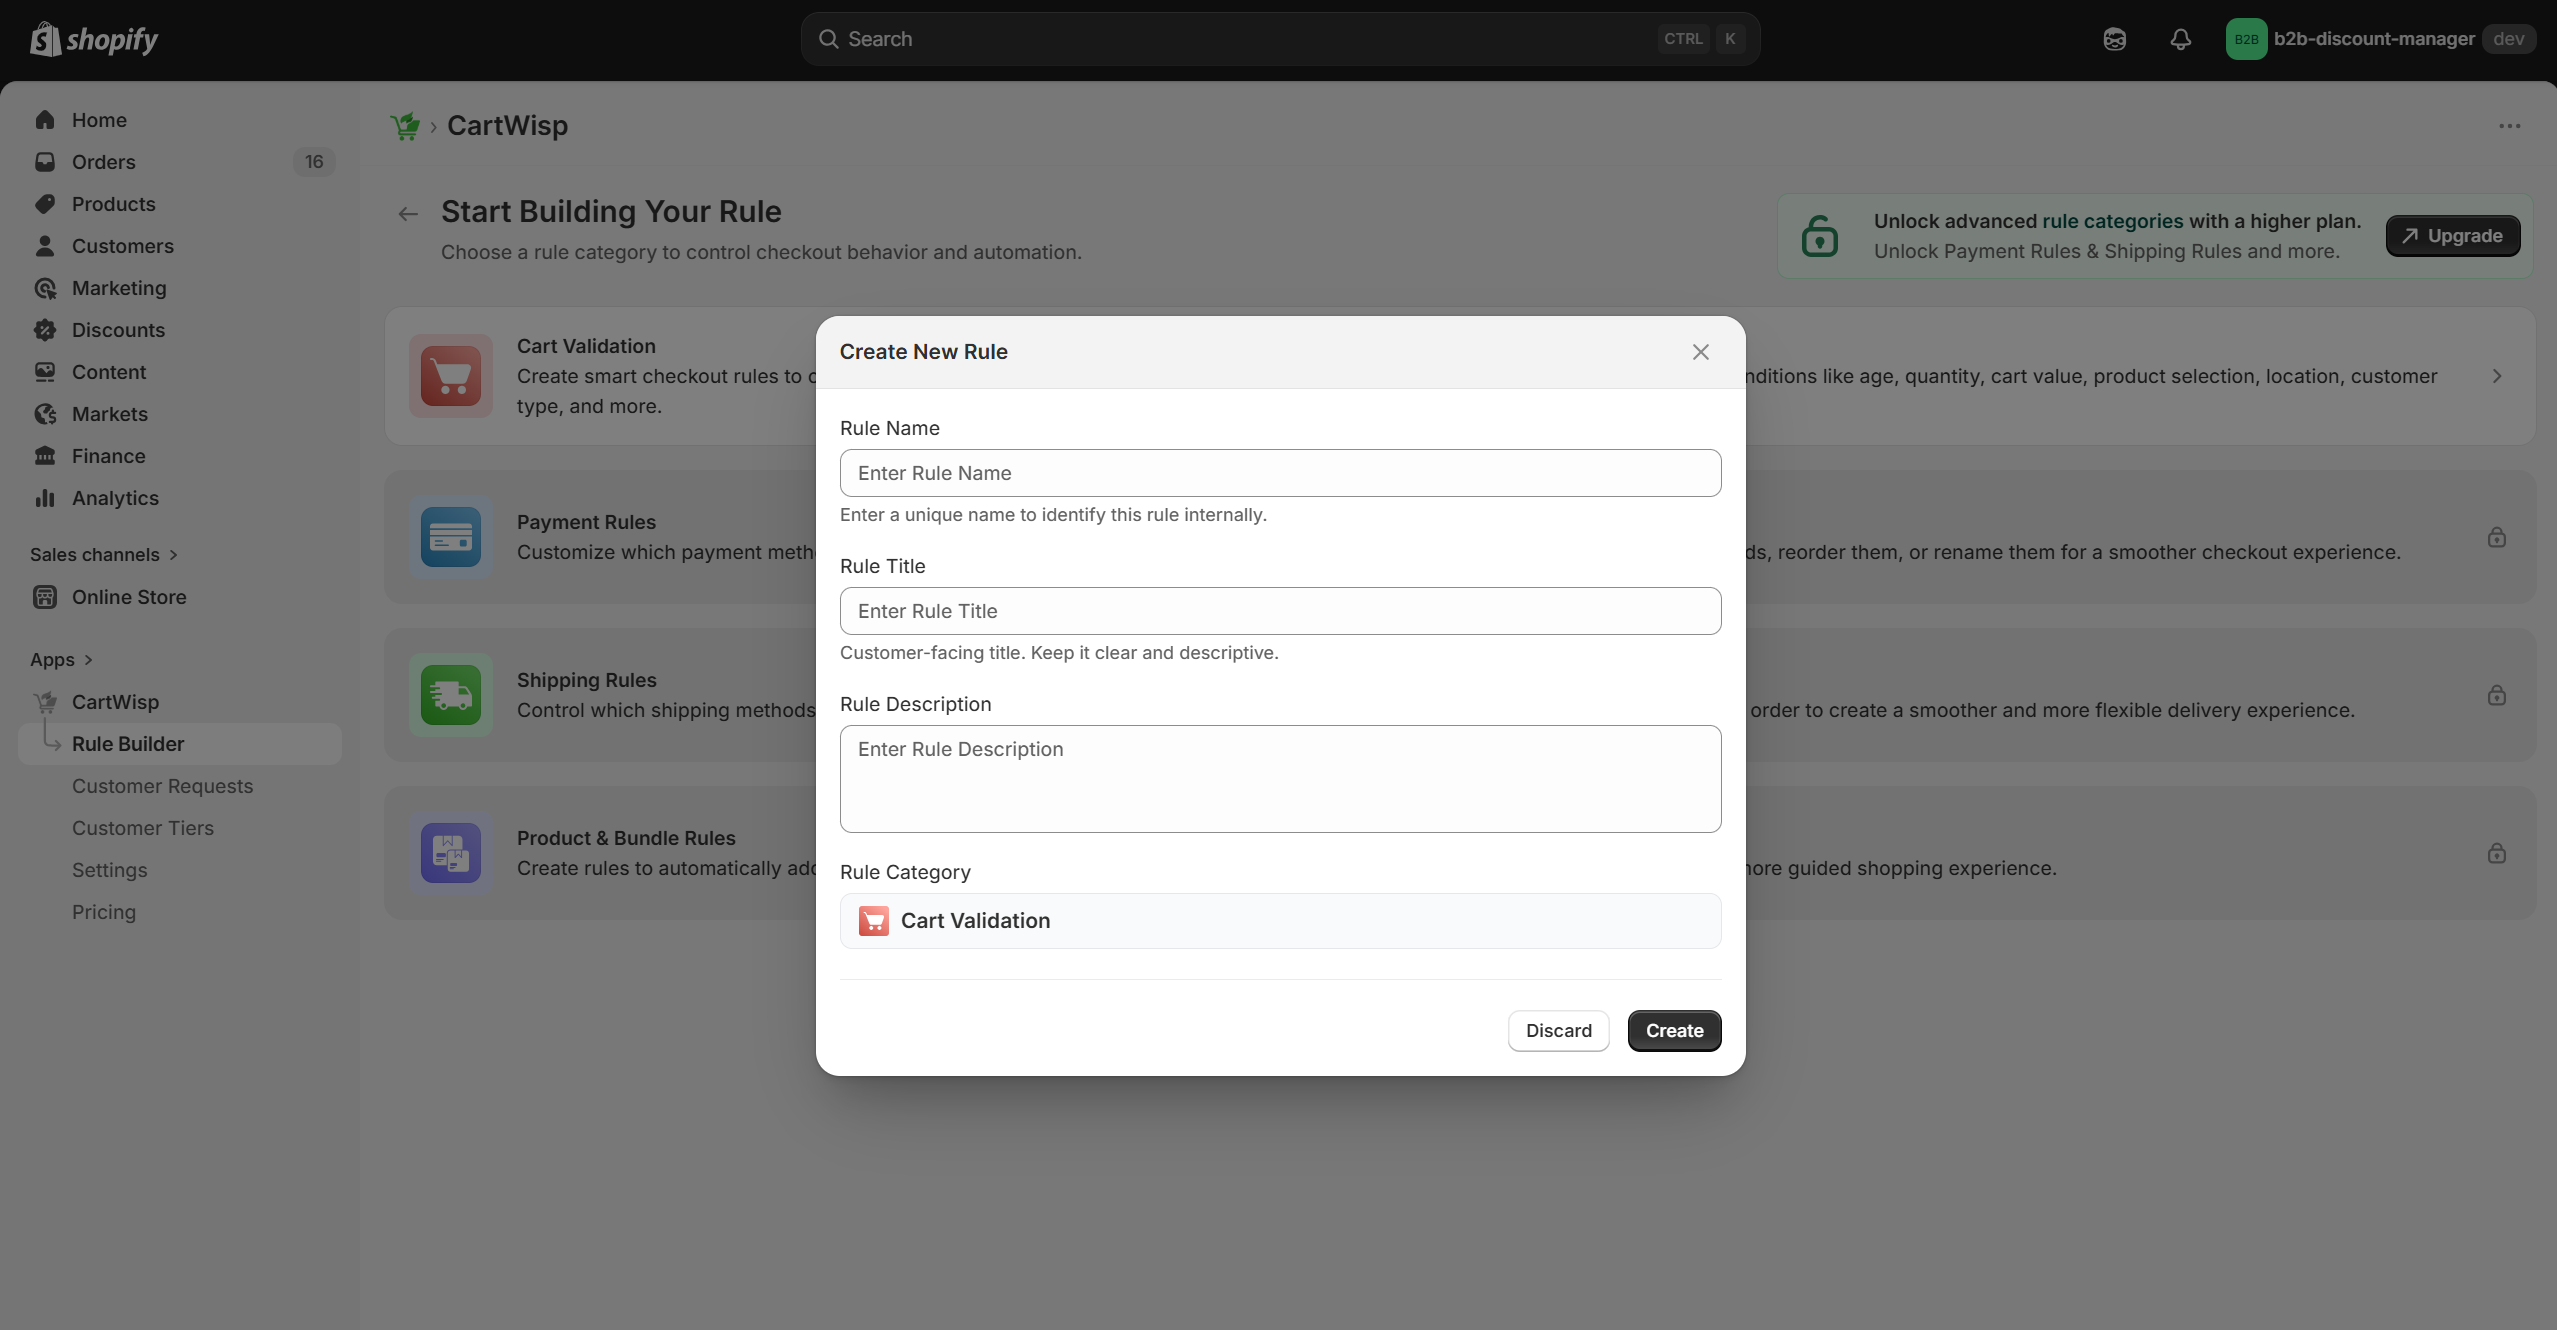
- Enter a Rule Name.
- Add a Rule Title and short description.
- Click Create to start configuring the checkout rule.
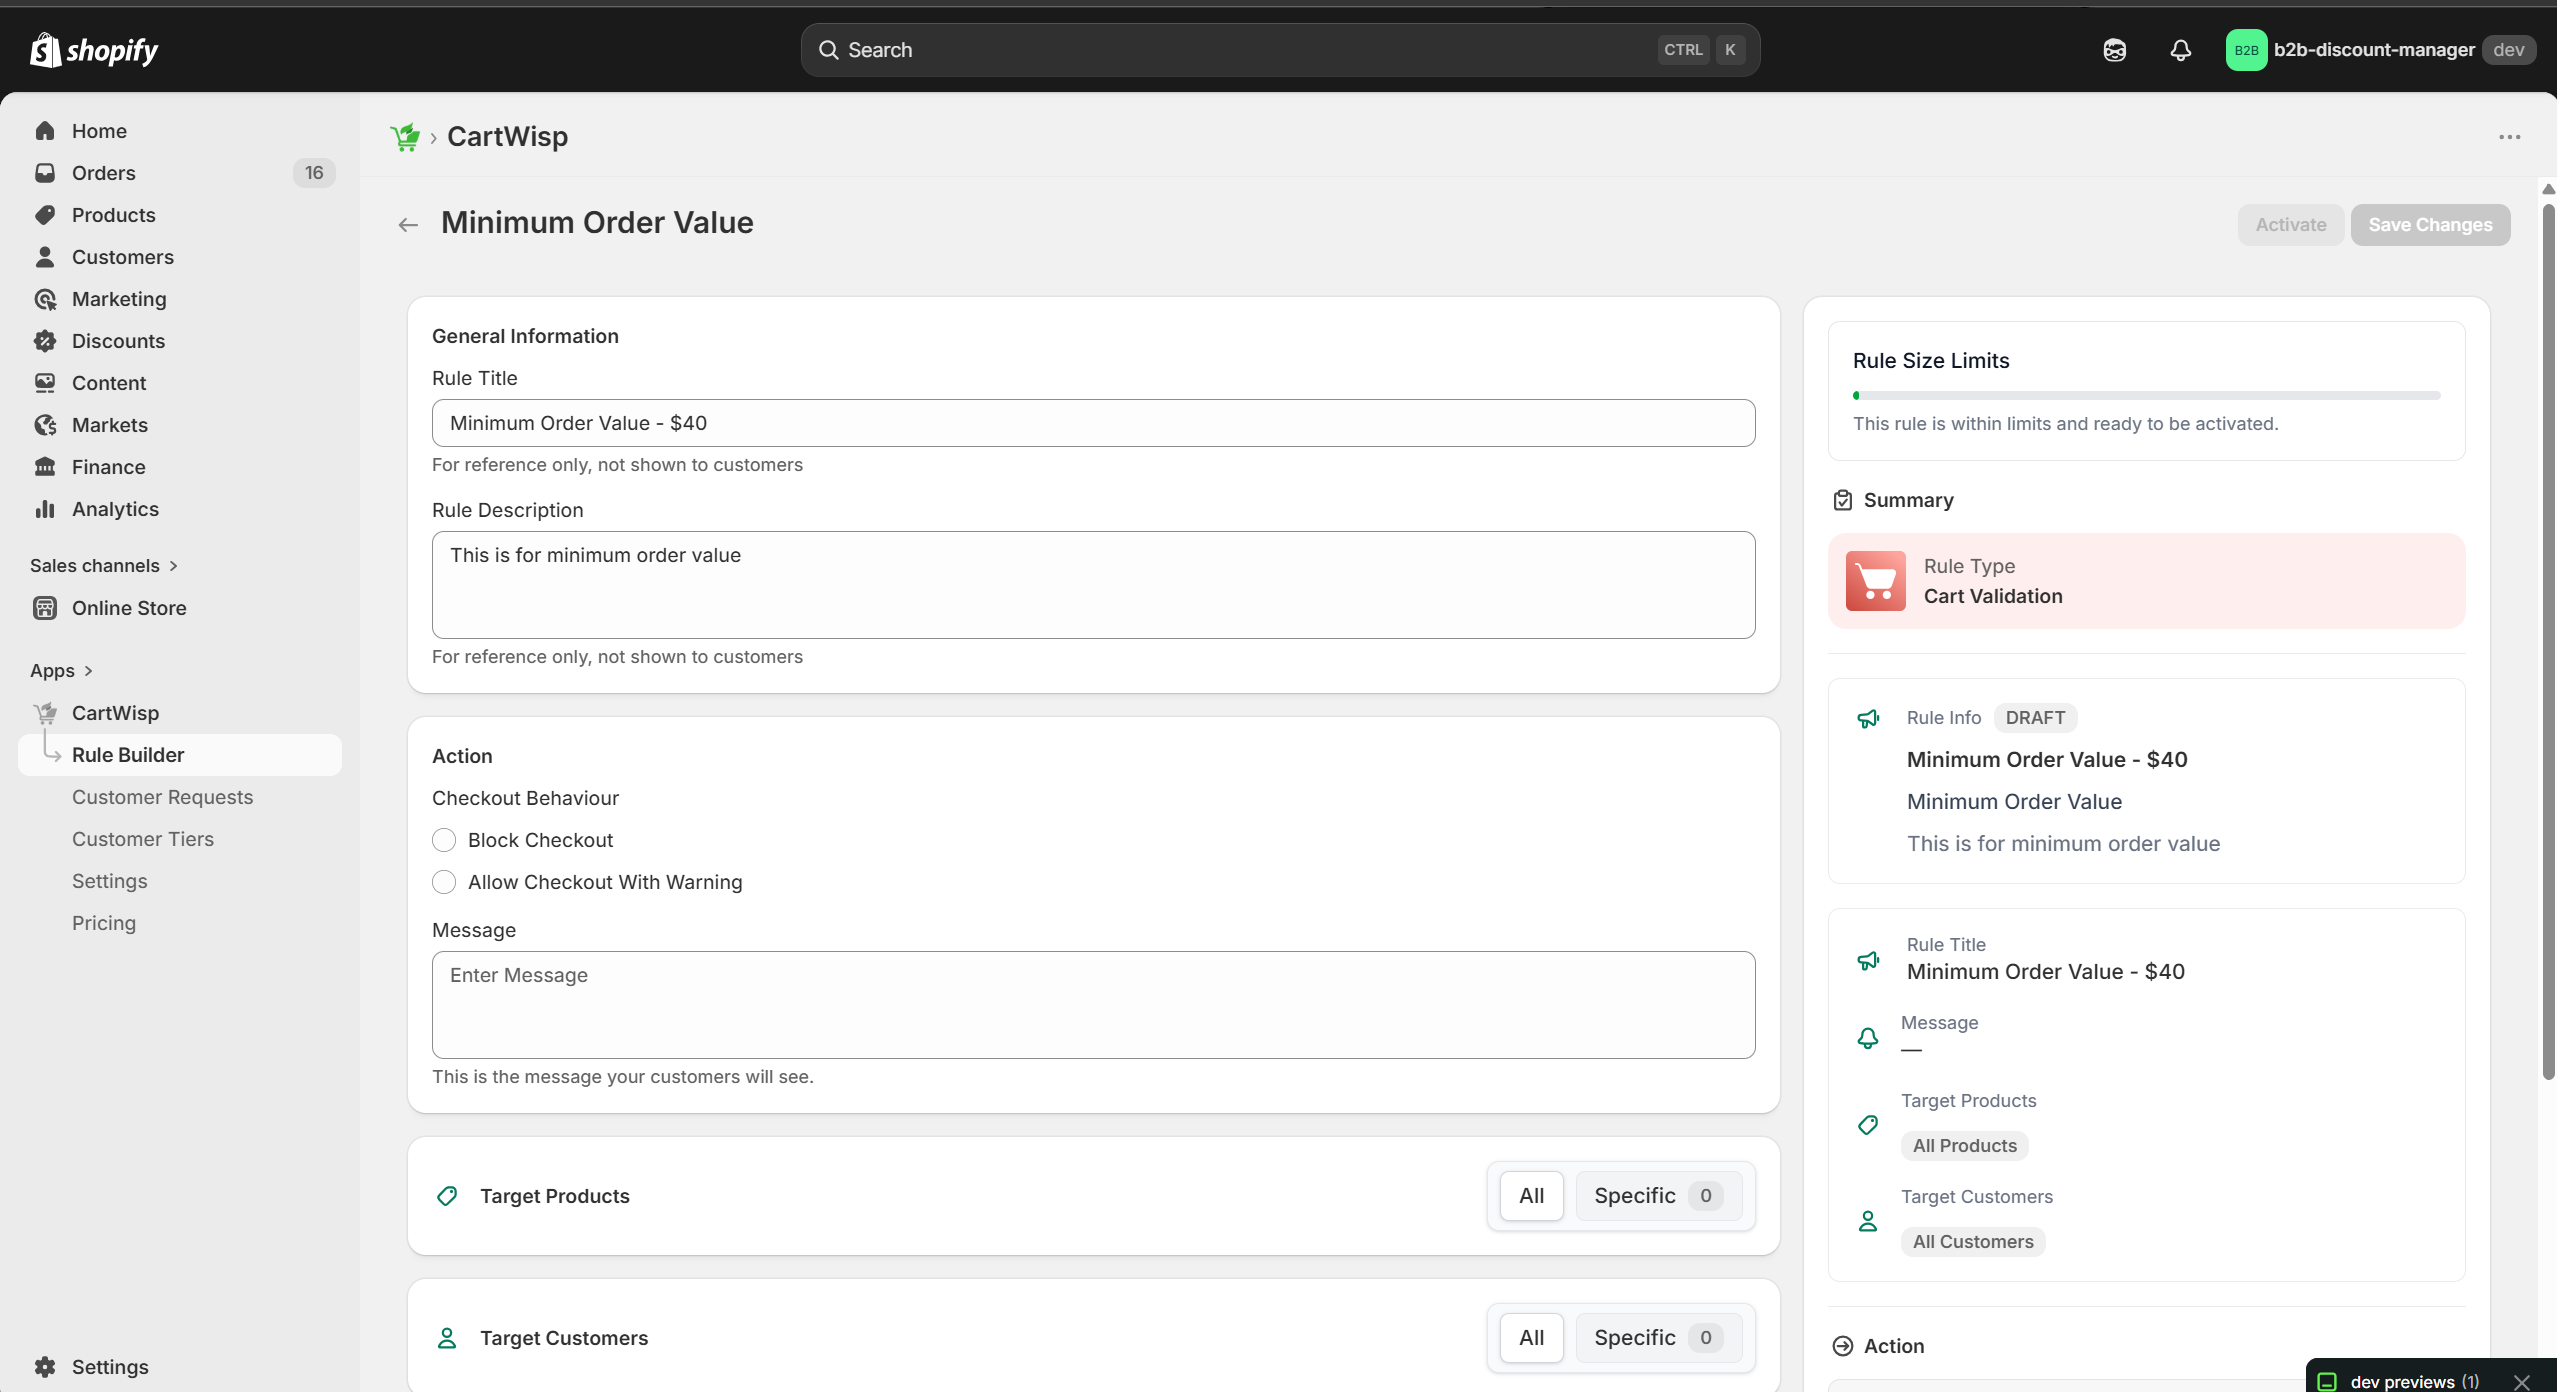
- Select the rule Action and add a clear customer-facing message.
- Configure the target products/collection the rule should apply to.
- Configure the target customers/tiers the rule should apply to.
- Configure the rule conditions.
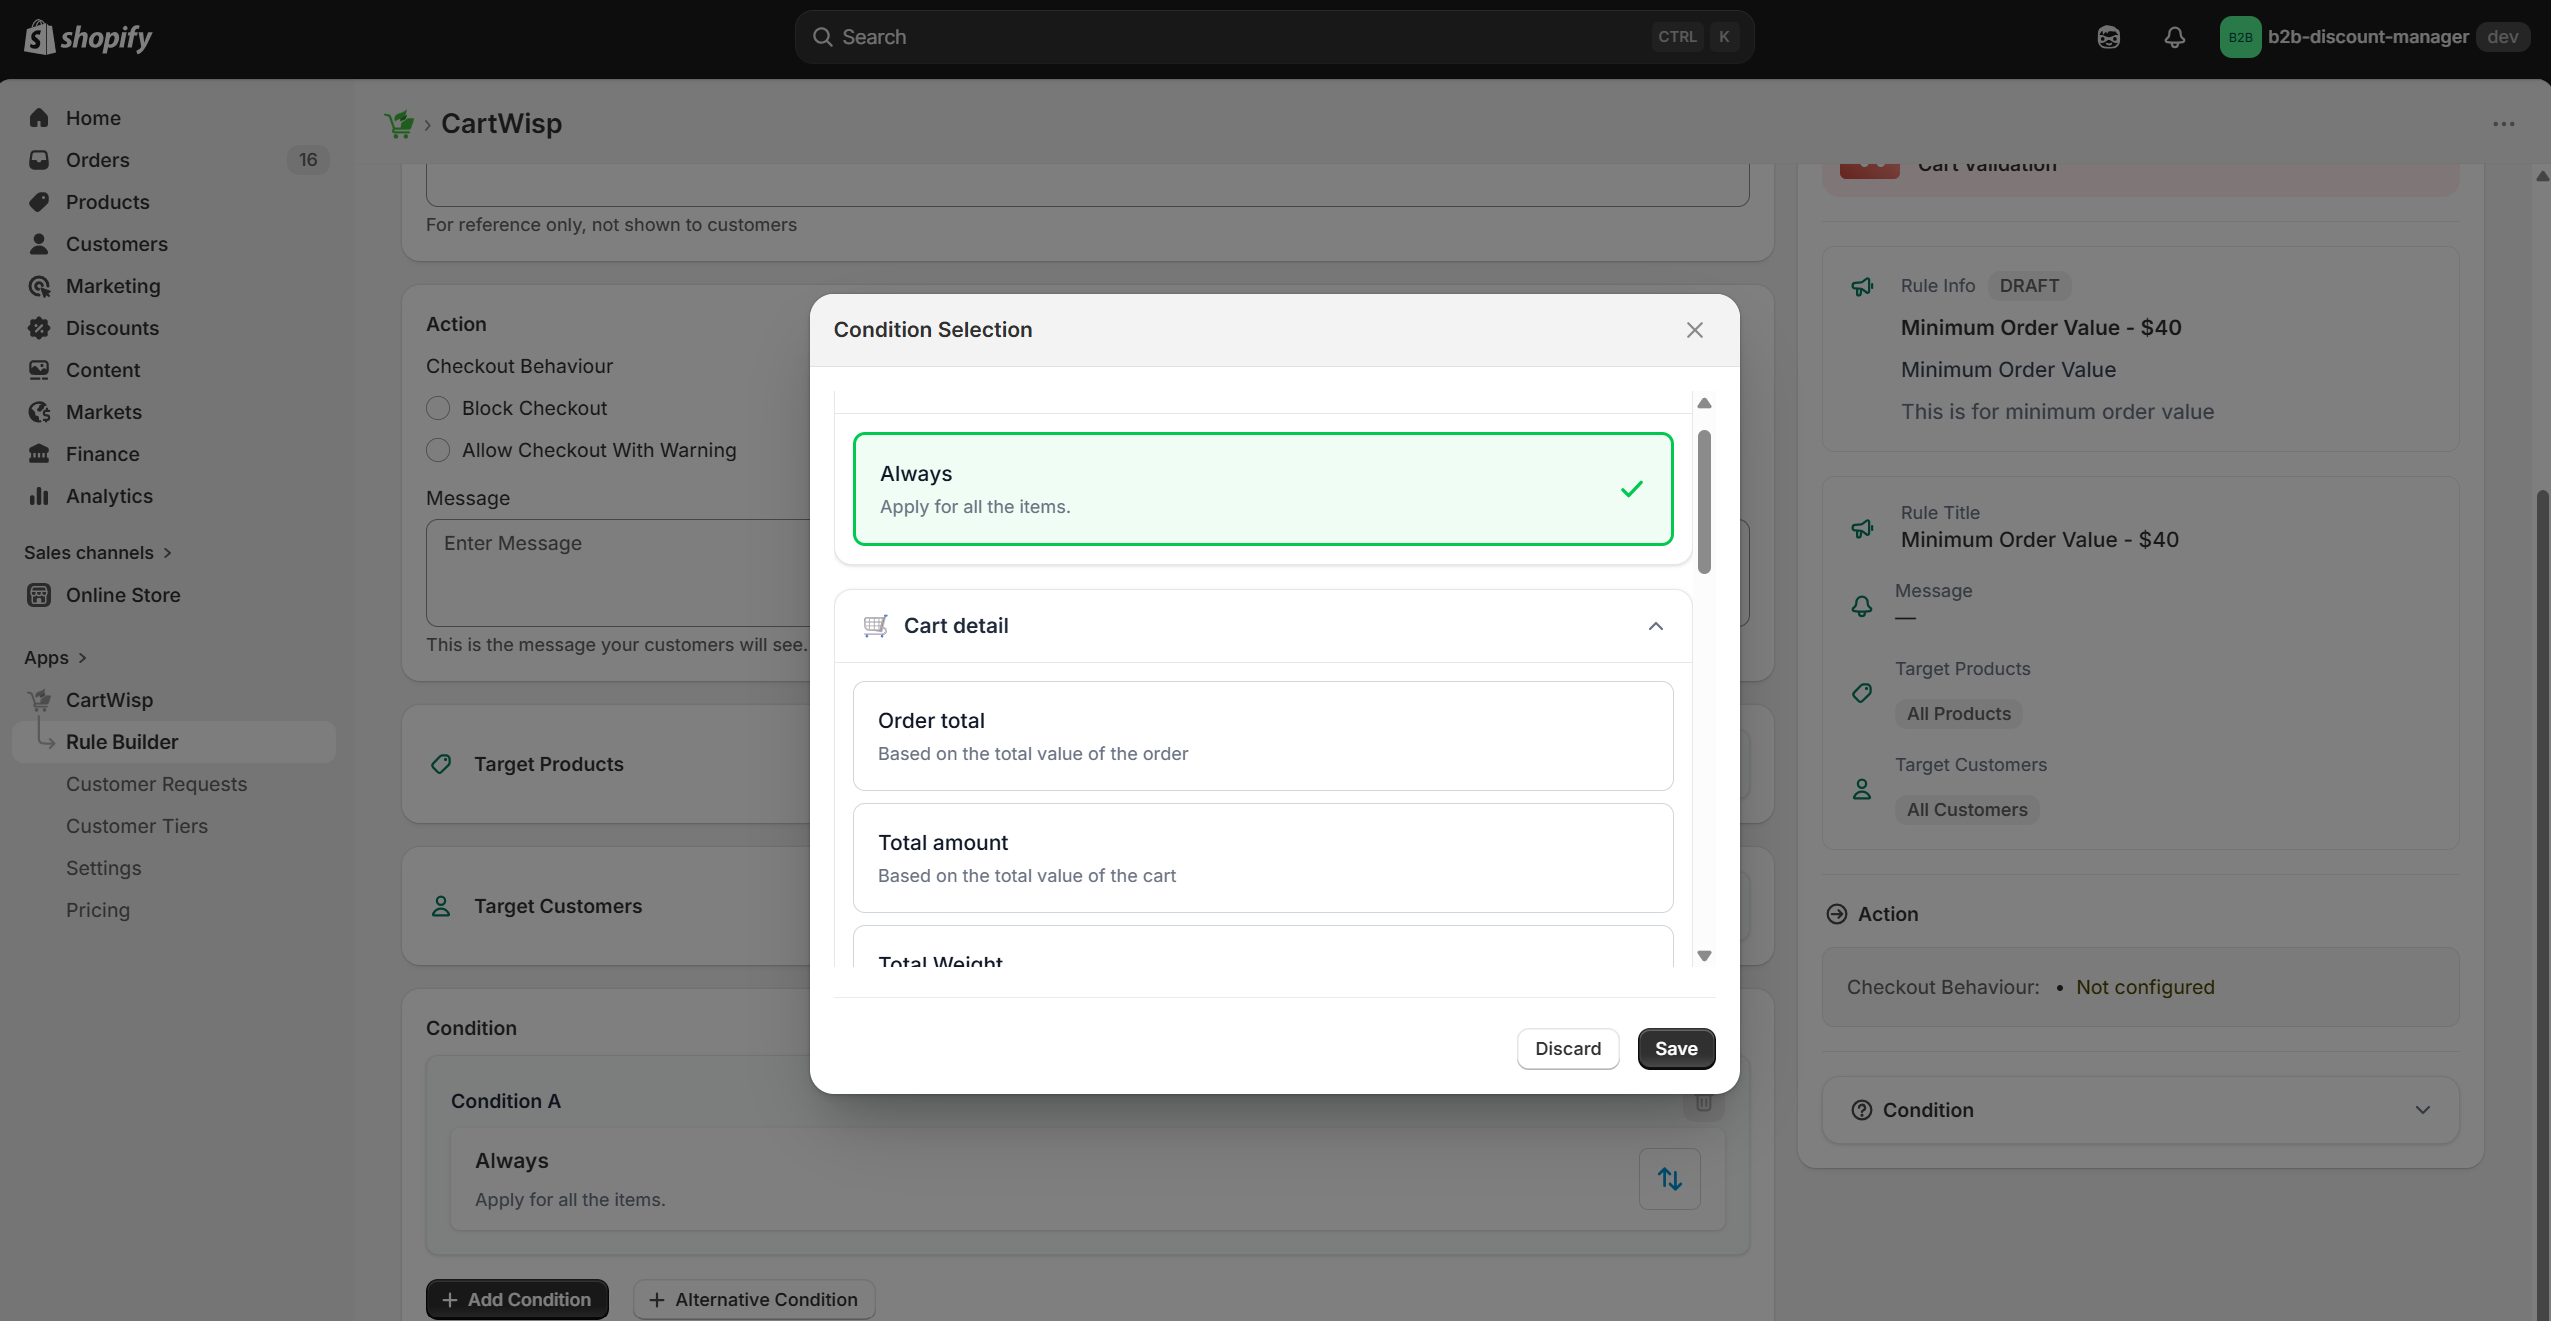
- Select the condition you want to use for checkout control.
- Configure the operator and value based on the selected condition.
- Add more conditions or alternative conditions as needed.
- Make sure the rule size is within limits.
- Review the Rule Summary.
- Save the rule.
- Test and validate the rule to confirm it behaves as expected.
- Activate the rule when ready.
Each step helps define how the rule behaves during checkout, including when it applies, who it applies to, which products it affects, what condition must be met, and what action should be triggered.
When adding multiple conditions, use condition logic carefully:
- AND logic means all selected conditions must be met for the action to trigger.
- OR logic means the action can trigger when any one of the selected conditions is met.
For example, if a rule uses AND logic for “cart contains alcohol” and “customer tier is not Above 18,” both conditions must be true for checkout to be blocked. If a rule uses OR logic for “shipping state is restricted” or “shipping address is a P.O. Box,” the rule can trigger when either condition is true.
Editing an Existing Rule
You can edit an existing checkout rule anytime from the Rule Builder.
To edit a rule:
- Open the CartWisp dashboard.
- Go to Rule Builder.
- Find the rule you want to update from the Rule Summary Table.
- Use the search or filter options if needed.
- Click the rule to open on edit mode.
- Update the rule details, such as:
a. Rule name
b. Rule title and description
c. Action
d. Customer-facing message
e. Target products/collection
f. Target customers/tiers
g. Rule conditions
h. Operators and values
i. AND/OR condition logic - Make sure the updated rule size is within limits.
- Review the updated Rule Summary.
- Save the changes.
- Test and validate the updated rule.
- Keep the rule active or activate it again when ready.
After editing a rule, it is strongly recommended to test it before relying on it in live checkout. Even a small change in target products, customer tiers, condition logic, operator, or value can change when the rule triggers.
For example, changing a condition from equals to does not equal, or switching logic from AND to OR, may cause the rule to apply to more checkout scenarios than expected. Testing helps ensure the updated rule still matches your checkout control requirement.
Selecting a Rule Category
The rule category determines the type of checkout behavior you want to control.
Common rule categories include:
- Cart Validation
- Payment Rules
- Shipping Rules
- Product & Bundle Rules
Selecting the correct category helps CartWisp present the right configuration options for the rule.
For example, if you want to block checkout when cart subtotal is below $40, select a Cart Validation category.
If you want to disable COD above $500, select a Payment Rule category.
Entering Rule Name, Title, and Description
When creating a rule, use a clear name and description.
The rule name is usually used internally by your team.
Example:
- Minimum Order Value - $40
The rule title may be used to summarize the rule purpose.
Example:
- Require Minimum Order Value
The short description should explain why the rule exists.
Example:
- This rule prevents customers from placing orders below $40 to protect fulfillment and operational costs.
Clear names and descriptions make rules easier to manage as your store grows.
Avoid vague names such as:
- Rule 1
- Checkout Block
- Product Rule
- Test Rule
Instead, use descriptive names such as:
- Block Alcohol Purchase for Unverified Customers
- Disable COD Above $500
- Prevent Subscription and One-Time Product Mixing
- Require Warranty with Electronics
- Block CBD Products in Restricted States
Configuring Target Products or Collection
CartWisp allows merchants to define which products or collections a rule should apply to.
You may target:
- All products
- Specific products
- Specific SKUs
- Product collections
- Product tags
- Product groups
This is important because not every rule should apply to the entire store.
Example:
- If you are blocking CBD products in restricted states, the rule should target only CBD products or the CBD collection, not every product in your store.
- If you are limiting a promotional product to one unit per order, the rule should target only that promotional SKU.
Precise targeting reduces accidental checkout blocking.
Configuring Target Customers or Tiers
CartWisp also allows rules to apply only to specific customers or Customer Tiers.
You may target:
- All customers
- Customers with specific Shopify tags
- Customers assigned to specific CartWisp Customer Tiers
Example:
- A wholesale MOQ rule should apply only to customers classified as Wholesale Buyer.
- An age-restricted product rule may apply to customers who are not classified as Above 18.
- A B2B minimum order value rule may apply only to approved business customers.
Targeting customers and tiers correctly helps ensure rules are fair, accurate, and aligned with your business policy.
Configuring Rule Conditions
Rule conditions define when the rule should trigger.
Depending on the rule category, conditions may include:
- Always
- Order Total
- Total Amount
- Total Weight
- Total Quantity
- Customer Tags
- Customer Total Spent
- Country Code
- Province Code / State Code
- City / Area
- PO Box
- Not PO Box
Example conditions:
- Order Total is less than $100
- Total quantity is greater than 5
- Country Code is US
- PO Box is 123456
- Customer total spent is greater than $1000
Conditions should be as specific as possible to avoid blocking valid customers.
Selecting Rule Action
The action determines what CartWisp does when the rule condition is met.
Common actions include:
-
Block Checkout Prevents the customer from completing checkout.
-
Allow Checkout with Warning Allows customer to checkout but a warning message is displayed
Use hard blocking for mandatory policies, such as compliance restrictions or eligibility requirements.
Use allow checkout when you want the checkout to happen. But include some clear messaging to provide guidance or smart suggestions when customers can easily fix the issue by changing their cart, address, or payment method.
Writing Customer-Facing Messages
Checkout blocking messages are important because they explain why checkout cannot continue.
A good message should:
- Be clear
- Be short
- Explain the issue
- Tell the customer what to do next
- Avoid technical language
Poor message:
- Rule validation failed.
Better message:
- Minimum order value is $40. Please add more items to continue.
Another good example:
- This product cannot be shipped to your selected state. Please remove it from your cart or choose another address.
Another example for verification:
- This product requires age verification. Please submit a tier classification request before checkout.
Clear messages reduce confusion and help customers resolve checkout issues without contacting support.
Rule Size and Limits
While creating a rule, make sure the rule size is within limits. This is a restriction from Shopify platform that needs to be met while creating the checkout rules.
Rule size may depend on:
- Number of conditions
- Number of targeted products
- Number of targeted collections
- Number of customer tiers
- Number of regions or ZIP codes
- Number of included or excluded options
- Complexity of condition groups
If a rule becomes too large, consider splitting it into smaller rules.
For example, instead of creating one massive rule for every restricted product and region, create separate rules by product category or region group.
This keeps rules easier to test, maintain, and troubleshoot.
Example Checkout Rules
Example Rule: Minimum Order Value
Rule Name: Minimum Order Value - $40
Condition: Order Total is less than $40
Action: Block checkout
Customer Message: Minimum order value is $40. Please add more items to continue.
This rule prevents customers from placing orders below the required cart value.
This is useful for:
- Protecting fulfillment margins
- Local delivery minimums
- Wholesale order requirements
- Low-value order prevention
Example Rule: Maximum Quantity Per SKU
Rule Name: Limit Promo Product to 1
Condition: Total quantity is greater than 1 for selected SKU
Action: Block checkout
Customer Message: This promotional item is limited to 1 unit per order. Please reduce the quantity to continue.
This rule prevents promotional inventory abuse.
This is useful for:
- Flash sales
- Limited product drops
- Sample product limits
- Anti-reseller protection
Example Rule: Age Verification Required
Rule Name: Require Above 18 Verification
Condition: Customer tier is not Above 18
Actio: Block checkout
Customer Message: This product requires age verification. Please submit a tier classification request before checkout.
This rule prevents unverified customers from purchasing restricted products.
This is useful for:
- Alcohol products
- Vape products
- Age-sensitive products
- Regulated goods
Example Rule: Disable International Orders
Rule Name: Disable International Orders
Condition: Country Code is not US
Action: Block Checkout
Customer Message: Order Delivery is not available for international orders.
This rule helps block the international orders.
Example Rule: Disable Shipping without P.O. Box
Rule Name: Block Shipping without P.O. Box
Condition: Shipping address does not contain P.O. Box
Action: Block checkout
Customer Message: We cannot ship this order without a P.O. Box address. Please enter a valid PO Box in the address to continue.
This rule helps prevent failed deliveries and unsupported shipping scenarios.
Activating and Deactivating Rules
An active rule affects live checkout. An inactive rule does not affect checkout.
Deactivate a rule when:
- A promotion ends
- A restriction is no longer needed
- A rule needs editing
- A rule is causing unexpected behavior
- You want to test a different rule configuration
Before activating a rule, always test it with both valid and invalid checkout scenarios.
Duplicating Rules
Checkout rules can be duplicated by clicking on “Clone” from the actions. Duplicating rules can save time when creating similar checkout policies.
For example, if you have one state restriction rule for alcohol, you may duplicate it and adjust the product collection or region for another restricted product.
After duplicating a rule, always update:
- Rule name
- Rule description
- Target products/collection
- Target customers/tiers
- Conditions
- Customer-facing message
This prevents confusion between similar rules.
Common Store Workflows
Workflow 1: Enforcing Minimum Order Value
Use this workflow when your store needs a minimum cart value before accepting orders.
Steps:
- Open Rule Builder.
- Click Create New Rule.
- Select the minimum order value rule category.
- Enter rule name, title, and description.
- Set the minimum cart value.
- Configure target products/collection if needed.
- Configure target customers/tiers if the rule applies only to selected customers.
- Add a customer-facing message.
- Save and test.
- Activate the rule.
Example message:
- Minimum order value is $40. Please add more items to continue.
Workflow 2: Blocking Restricted Products by Region
Use this workflow when a product cannot be sold or shipped to certain regions.
Steps:
- Open Rule Builder.
- Click Create New Rule.
- Select the country/state restriction rule category.
- Enter rule name, title, and description.
- Select target products/collection.
- Select restricted countries or states.
- Add a customer-facing message.
- Save and test with restricted and unrestricted addresses.
- Activate the rule.
Example message:
- This product cannot be shipped to your selected state. Please remove it from your cart or choose another address.
Workflow 3: Requiring Customer Tier Classification
Use this workflow when customers need approval before purchasing restricted products.
Steps:
- Create the required Customer Tier, such as Above 18.
- Add the Customer Tier Classification Request Extension to the storefront.
- Create a rule in Rule Builder.
- Target the restricted products or collection.
- Configure target customers/tiers.
- Set condition: customer is not classified as required tier.
- Set action: block checkout.
- Add customer-facing message.
- Save and test.
- Activate the rule.
Example message:
- This product requires age verification. Please submit a tier classification request before checkout.
Summary
The CartWisp Store Guide helps merchants manage checkout governance from the Shopify Admin.
Using CartWisp, store admins can:
- Access the dashboard
- Create and manage Customer Tiers
- Add and use the Customer Tier Classification Request Extension
- Review and process tier classification requests
- Create checkout rules using Rule Builder
- Configure target products/collection
- Configure target customers/tiers
- Add customer-facing checkout messages
- Test rules before activation
- Review shipping and payment controls
- Monitor rule triggers and analytics
- Optimize checkout governance over time
CartWisp is most effective when merchants treat checkout rules as an ongoing operational system. Start with the most important rules, test them carefully, educate customers early, monitor performance, and refine your checkout governance as your store grows.
Need Help?
If you encounter any issues, contact the CartWisp Support Team for help.
When reaching out, include your store name, Shopify store URL, issue description, screenshots if available, and any relevant rules or checkout details.